
Installation Instructions


RestrainingtheReelforInstalling
ThreadedInserts
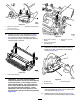
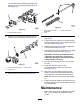
1.Insertalong-handledprybar(recommended3/8
x12incheswithscrewdriverhandle)throughthe
frontofthecuttingreel,closesttothesideofthe
cuttingunitthatyouwillbetorquing(Figure43).
2.Placetheprybaragainsttheweldsideofthe
internalcuttingreelreinforcement(Figure43).
Note:Theprybarshouldcontactabladeatthe
front,thereelshaft,andabladeatthebackof
thebackofthereel,lockingitinplace.
Important:Toavoiddamagingthecutting
edgeand/orcausingahighblade,donot
contactthecuttingedgeofanybladeswith
theprybar.
Important:Theinsertontheleftsideof
thecuttingunithasleft-handthreads.The
insertontherightsideofthecuttingunithas
right-handthreads.
g280384
Figure43
1.Threadedinsertfor
installation
3.Weldsideofsupportplate
2.Reelshaft
4.Prybar
3.Restthehandleoftheprybaragainsttheroller.
4.Pertheinsert’sinstallationinstructionsand
torquerequirements,completetheinstallationof
thethreadedinsertwhileensuringthatthepry
barstaysinplace,thenremovetheprybar.
18