
Installation Instructions


1
GatheringtheAppropriate
Tools
NoPartsRequired
Procedure
Acquirethefollowingtoolsbeforeproceedingwiththe
installation:
•1/2deep-wellsocket
•9/16socket
•5/8socket
•1/2wrench
•9/16wrench
•1/8Allenwrench
•5/16Allenwrench
•3/8-16tap
•12-inchstraightedge(optional,ToroPart
114-5446)
•Torquewrench(foot-pound)
•Torquewrench(inch-pound)
•Blue243Loctite
2
DeterminingtheOrientation
oftheRollerBrushes
NoPartsRequired
Procedure
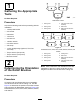
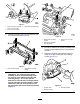
Allcuttingunitsareshippedwiththecounterweight
mountedtotheleftendofthecuttingunit.Usethe
Figure1todeterminethepositionoftherollerbrushes
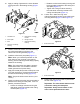
andreelmotorsforReelmaster3100-DorFigure2for
Reelmaster5210,5410,5510,5610,6500-D,6700-D,
and7000-D.
g029306
Figure1
Reelmaster3100-D
1.Cuttingunit14.Leftrollerbrushdrive
assembly
2.Cuttingunit2
5.Reelmotor
3.Cuttingunit3
6.Rightrollerbrushdrive
assembly
g027187
Figure2
Reelmaster5210,5410,5510,5610,6500-D,6700-D,and
7000-D
1.Cuttingunit15.Cuttingunit5
2.Cuttingunit2
6.Reelmotor
3.Cuttingunit3
7.Rightrollerbrushdrive
assembly
4.Cuttingunit48.Leftrollerbrushdrive
assembly
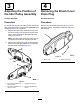
Note:Theseinstructionsandillustrationsshowthe
installationofthekitoncuttingunitswiththeend
weightsmountedontheleftendofthecuttingunit.
3