
Installation Instructions


3
AdjustingthePositionof
theIdlerPulleyAssembly
NoPartsRequired
Procedure
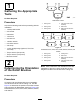
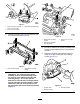
Ontheleftfrontandleftrearcuttingunits,reversethe
idlerpulleyassemblytomountontherightendofthe
cuttingunit(Figure3),asfollows:
1.Removetheidlerpulleyassemblyfromtheleft
endofthecuttingunitandmountittothelower
holeinthebrushplateontherightendofthe
cuttingunit(Figure3).
Note:Theidlerpulleymustpivotfreely;donot
overtightenthelocknutontheidlerpivotbolt.
2.Removethecarriageboltandnutandrelocate
themtotheupperholepreviouslyoccupiedby
theidlerpulleyassembly(Figure3).
g029307
Figure3
1.Idlerpulleyinstallationfor
leftendofreel
3.Carriageboltandnut
2.Idlerpulleyinstallationfor
rightendofreel
4.Donotovertightenthis
locknut.
4
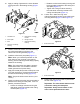
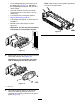
RemovingtheBrushCover
DrainPlug
NoPartsRequired
Procedure
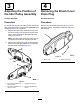
Removeonlythebottomdrainplug(Figure4)from
thebrushcovers.Thisallowsmoisturetodrainfrom
thebeltarea.
g009049
Figure4
1.Brushcover2.Bottomdrainplug
4