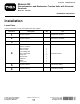
Form No. 3422-963 Rev A Beacon Kit Groundsmaster® and Reelmaster® Traction Units with Universal Sunshade Model No. 138-2699 Installation Instructions Installation Loose Parts Use the chart below to verify that all parts have been shipped. Procedure 1 2 3 4 5 6 © 2018—The Toro® Company 8111 Lyndale Avenue South Bloomington, MN 55420 Description Qty. Use No parts required – Prepare the machine. No parts required – Remove the sunshade. No parts required – Install the Switch Panel Kit.
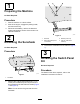
1 Preparing the Machine No Parts Required Procedure 1. Park the machine on a level surface. 2. Shut off the engine, engage the parking brake, and remove the key. 3. Disconnect the battery; refer to the electrical system maintenance section of the traction unit Operator’s Manual. g244328 2 Figure 2 Removing the Sunshade 1. Grommet 3. Washer (5/16 inch) 2. Flange-head bolt (5/16 x 1-1/4 inches) 4. Clip nut (side-frame channel) 2.
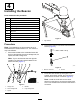
4 Installing the Beacon Parts needed for this procedure: 1 Beacon Beacon connector 1 Beacon bracket 1 Beacon socket 1 Long carriage bolt 1 Short carriage bolt 2 Flange nut 1 Wire harness 6 Cable ties 1 Switch 1 Fuse (15 A) g245382 Figure 4 1. Light bracket Procedure 2. Note: The illustrations in this procedure show a Remove the beacon connector from the beacon socket (Figure 5). Reelmaster 5010 series traction unit. Your machine may look different. 1.
g246192 g246194 Figure 6 1. Beacon connector 2. Harness terminals 3. Socket 4. Figure 8 4. Nut 5. Washer 6. Harness 1. Socket 2. Nut 3. Washer Install the beacon connector into the beacon socket by rotating the beacon socket (Figure 7). 6. Note: This prevents the wire harness from becoming twisted. g246210 Figure 7 1. Beacon connector 5. 2. Socket Install the beacon socket to the bracket as shown in Figure 8.
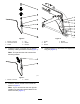
g245425 Figure 11 1. Plug 3. Electrical connector 2. Switch 10. Plug the electrical connector into the switch and install the switch into the switch panel (Figure 11). 11. Insert the fuse (15 A) into the third position from the left when looking at the fuse block (Figure 12). Note: The fuse may not need to be installed if a fuse has already been installed from another Toro kit. g246193 Figure 9 7. 8.
5 Connecting the Battery No Parts Required Procedure Connect the battery; refer to the electrical system maintenance section of your Operator’s Manual. 6 Installing the Sunshade No Parts Required Procedure 1. Align the holes in the grommets of the sunshade with the 4 clip nuts of the side-frame channels. 2. Assemble the sunshade to the frame channels (Figure 2) with the 4 flange-head bolts (5/16 x 1-1/4 inches) and 4 washers (5/16 inch) that you removed earlier. 3.
Notes: