
Installation Instructions


3
InstallingtheKit
Partsneededforthisprocedure:
1
Groomershaft
1
Cover
1Drivenpulley
1
Spacer
1Flangelocknut
InstallingtheBladesandSpacers
totheGroomerShaft
Installyourdesiredgroomingbladeandspacer
congurationtothegroomershaft.Contactyour
authorizedT orodistributortoacquireadditionalblades
orspacers.
InstallingtheGroomerShaftand
DrivenPulley
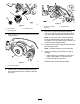
1.Applyalightcoatingofgreasetotheendsof
thegroomingshaftandtotheseallips(Figure
9)inthedriveandsupportplates.Ensurethat
allbearings,bushings,andsealsareproperly
installed.
g027981
Figure9
Groomershaftshowninsertedtothedrive-plateassembly
1.Groomershaft2.Seal
2.EnsurethatanO-ring(includedinthe
groomer-shaftassembly)isinstalledonthe
groomingshaftandapplyalightcoatingof
greasetotheO-ring.
3.Carefullyplacethegrooming-shaftassembly
intotheleftsupportplate(i.e.,leftsideofthe
cuttingunit).
Important:Whileinstallingtheassembly,
ensurethatyoudonotdamagethe
support-platesealortheO-ringontheshaft.
4.ApplyalightcoatingofgreasetotheO-ringon
thedrive-plate-assemblypivothubandthepilot
boreofthecutting-unitsideplate(rightsideof
thecuttingunit).
5.Positionthegroomershim[removedinstep
9in2RemovingtheExistingGroomerShaft
andDrivenPulley(page1)]tothedrive-plate
assembly.
6.Carefullyplacethedrive-plateassemblyonto
thegroomershaft.
Important:Whileinstallingtheassembly,
ensurethatyoudonotdamagethe
drive-plateseals.
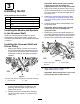
7.Positionthegroomer-drive-plateassemblyto
thecutting-unitframeandsecureittotheframe
with2shoulderbolts(Figure10).Ensurethat
thedriveplaterotatesfreelyafterinstallation.
g016240
Figure10
1.Groomer-drive-plate
assembly
2.Shoulderbolts
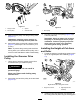
8.Applyalightcoatingofgreasetothe
driven-pulley(Figure11)hub.
Important:Ensurethatgreaseisnotonthe
pulleysurfacethatcontactsthebelt.
4