
Installation Instructions
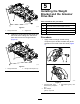


2.Attachtheappropriatereeladaptertothe
groomershaft(Figure7)andtorqueitto150to
163N∙m(110to120ft-lb).
Note:Usetheyellowadapterontherightside
ofthemachine;usethegreenadapteronthe
leftsideofthemachine.Discardtheunusedreel
adapterincludedinthekit.
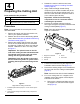
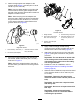
Note:Whentorquingthereeladapterand
drive-boxshaft,restrainthedrive-boxshaftwith
thegroomerdrive-boxsockettool,orawrench,
onthewrenchatsattheinboardsideofthe
groomerdrivebox(Figure8).
g350306
Figure8
Rightsideshown
1.Wrenchats(1-3/8inches)3.Groomerdrive-boxsocket
tool(137-0920)
2.Hexsocket(reeladapter)
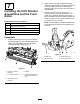
3.Securetheweightbrackettothereelusing2
hex-socket,button-headbolts(3/8x3/4inch)
asshowninFigure9.
Note:Attachtheweightbrackettothesideof
thereelwhereyouintendtomountthegroomer
drivebox.
g346923
Figure9
Leftsideshown
1.Weightbracket4.Thread-lockingcompound
2.Hex-socket,button-head
bolt—3/8x3/4inch(2)
5.Hex-head(T orqueto135
to150N∙m(100to110
ft-lb))
3.Groomerdrivebox(left
driveshown)
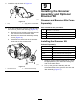
4.Applymedium-strengththread-locking
compound(suchasBlueLoctite®243)tothe
threadsoftheinternalreelshaft(Figure9).
5.Attachthegroomerdriveboxtothereelshaft
(Figure9)usingthehex-headonthegroomer
drivebox.
Important:Thereelthreadsontheleftside
ofthecuttingunitareleft-handed,andthe
reelthreadsontherightsideofthecutting
unitareright-handed.
6.Restrainthereelforinstallation;referto
RestrainingtheReelforInstallingThreaded
Inserts(page22).
7.Whilethereelisrestrained,torquethehex-head
ofthedrive-boxshaftto135to150N∙m(100
to110ft-lb).
Important:Torquethehexheadofthe
drive-boxshaftto135to150N∙m(100to110
ft-lb).
Important:Youmustusea6-pointsocket
withheavywall.
Important:Donotuseanimpactwrenchfor
thisstep.
Important:Allowthethread-locking
compoundtocurefor15minutesbefore
continuingtheprocedure.
6