
Installation Instructions


1
PreparingtheMachine
NoPartsRequired
Procedure
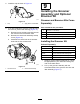
1.Parkthemachineonalevelsurface.
2.Engagetheparkingbrake.
3.Shutofftheengineandremovethekey;referto
yourOperator’sManual.
4.Ifthecuttingunitisinstalled,removethecutting
unitfromthetractionunit;refertotheOperator’s
Manualforthetractionunit.
2
GatheringtheTools
RequiredforSetup
Partsneededforthisprocedure:
–
Torquewrench(Notincluded)
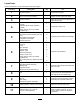
Note:Ensurethatthetorquewrenchesarecapable
oftorquingbothclockwiseandcounterclockwise.
•T orquewrench—5.2to6.8N∙m(46to60in-lb)
•T orquewrench—16to22N∙m(12to16in-lb)
•T orquewrench—20to26N∙m(15to19in-lb)
•T orquewrench—115to129N∙m(85to95ft-lb)
•T orquewrench—135to150N∙m(100to110ft-lb)
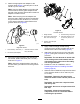
•Reeldriveshafttool,PartNo.TOR4112(usedonly
on5-inchreels)
•Reeldriveshafttool,PartNo.TOR4074(usedonly
on7-inchreels)
•Long-handledprybar(3/8x12inches)
ServiceTools
Oilsyringe(optional),PartNo.137-0872;referto
ChangingtheGearboxLubricant(page19).
Driveshafttool(optional),PartNo.137-0920;refer
toyourtractionunitServiceManualorcontactyour
authorizedT orodistributor.
3
DeterminingtheSetup
NoPartsRequired
Procedure
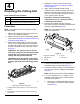
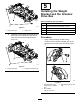
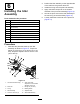
Usethefollowingdiagramtodeterminetheposition
ofthegroomerkitandreelmotors.
g027662
Figure2
1.Cuttingunit15.Cuttingunit5
2.Cuttingunit2
6.Reelmotor
3.Cuttingunit3
7.Rightgroomerkit
4.Cuttingunit48.Leftgroomerkit
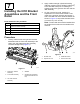
Note:Ifyouareinstallingagroomerkitandarear
roller-brushkitonthecuttingunit,installthegroomer
kitrst.
3