
Installation Instructions

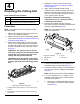
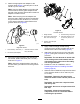
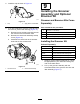

4.Ontheidlerassemblyside,alignthe
adjuster-armrodoftheHOCbracketwiththe
adjustercollarontheidlerassemblyandsecure
itwithashoulderboltasshowninFigure13;
torquetheshoulderboltto20to26N⋅m(15to
19ft-lb).
g346925
Figure13
1.Shoulderbolt
3.Adjustercollar
2.Adjuster-armrod4.Idlerassembly
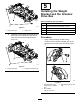
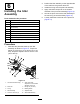
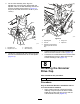
5.Tightenthecarriageboltsandlocknutssecuring
theHOCbracketassembliestothesideplates
(Figure14).
g346926
Figure14
1.Adjustingbolt4.Flangenut
2.Locknut
5.Capscrew
3.Carriageboltandange
locknut(3/8with5/8inch
hex)
6.TightenthelocknutontheHOCadjusterbolt,
thenbackoffthelocknut1/2turn(Figure14).
7.CenterthefrontrollerbetweentheHOCbracket
assembliesandlockitinplacewiththecap
screwsandangenuts(Figure14).
8
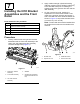
InstallingtheGroomer
DriveCap
Partsneededforthisprocedure:
1
Cap
Procedure
OnlyforUniversalGroomerassemblieswithno
rearrollerbrushkitinstalled:
1.Applymedium-strengthcylindricalbonding
retainingcompound(suchasGreenLoctite
609®)aroundthesnapringgrooveandthe
outerdiametersurface(Figure15).
9