
Installation Instructions


2
InstallingtheKit
Partsneededforthisprocedure:
1Damper
2Nut
Procedure
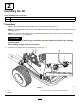
1.Removeanddiscardtheexistingdamperand2correspondingnuts(Figure1).
Note:Formachineswithserialnumber410399999andbelow,removetheweldnutonthefrontmounting
bracket(Figure1).
Note:Formachineswithserialnumber410399999andbelow,drilloutbothoftheexistingmounting
holesto7/16inch(11mm)diameter.
WARNING
Usingadrillwithoutwearingeyeprotectionmayallowdebristoentertheeye,causing
personalinjury.
Whendrilling,alwaysweareyeprotection.
2.Installthenewdamperand2correspondingnuts(Figure1).
g385704
Figure1
1.Nut
3.Weldnut(removeandreplacewithincludednut)
2.Damper
2