
Installation Instructions


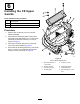

DrillingtheMountingHolesforthe
CELowerGuard
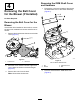
1.AlignthelowerCElowerguardtothe
blower-chutebracketasshowninFigure11.
g018859
Figure11
1.Hole1
7.Hex-headbolt(1/4x3/4
inch)
2.Hole2
8.Locknut(1/4inch)
3.Hole39.Rivettails
4.Hole410.Blower-chutebracket
5.CElowerguard11.Drillbit7mm(0.28inch)
6.Washer
2.Alignhole2andhole4ofthelowerCElower
guardtotherivettailsprotrudingthroughthe
blower-chutebracket(Figure11).
Note:EnsurethattheangeoftheCElower
guard(theangewiththeholes)isatagainst
theblower-chutebracket.
3.Marktheoutlineofhole1andhole3oftheCE
lowerguardontheblower-chutebracket,and
removetheCEguard(Figure11).
4.Locatethemarksontheblower-chutebracket,
andcenter-punchthelocations.
5.Drill7mm(0.28inch)holesintheblower-chute
bracketatthe2center-punchmarks(Figure11).
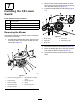
InstallingtheCELowerGuard
Note:InstalltheCElowerguardwiththeblower
assemblyremovedfromthemowerdeck;referto
theE-ZVac™BlowerandDriveKitInstallation
Instructions.
1.AligntheCElowerguardtotheblower-chute
bracket(Figure11).
2.Alignhole2andhole4oftheCElower
guardtotherivettailsprotrudingthroughthe
blower-chutebracket(Figure11).
3.SecuretheCElowerguardtotheblowerwith2
hex-headbolts(1/4x3/4inch),2washers,and
2locknuts(1/4inch)throughhole1andhole4
oftheCEguard(Figure11).
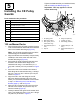
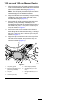
InstallingtheBlower
Ifyouremovedtheblower,installittothemowerdeck
asfollows:
Note:RefertotheBaggerKit(ToroModel78463)
manual.
1.Aligntheblowerbeltaroundthepulleyofthe
blower(Figure10).
2.Alignthepivotpinontheblowerwiththepivot
pinholeinthedeckandlowerthebloweronto
thedeck.
3.Opentheblowerlatchpin,closetheblowerto
thedeck,andsecurethelatchpintothechute
bracket(Figure9).
Note:Ensurethatthelatchpinextendsthrough
theholeinchutebracketandtheCEpulley
guard.
4.Temporarilyroutethebeltbeneaththeidler
pulley(Figure10).
5.Routethebeltaroundthedrivepulley(Figure
10).
6.Movetheidler/tensionpulleytowardthexed
springpost,andinstallthespringbyaligningthe
springhookontotheidlerspringpost(Figure9).
7.Pullthespringloadedidler/tensionpulleyaway
fromthexedspringpost,androutethebelt
aroundtheidlerpulley(Figure10).
10