
Operator's Manual


7
Installing the Handle
Folding or unfolding the handle improperly can
pinch, stretch, or damage one or more of the
cables. Any pinched, stretched, or damaged cable
may cause an operational failure that results in an
unsafe operating condition.
• Do not pinch, stretch, or damage the cables.
• Handle the cables with care when folding or
unfolding the handle.
• Do not use the lawn mower if one or more of the
cables are pinched, stretched, or damaged.
Contact your Authorized Service Dealer.
Warning
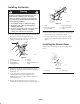
1. Lay the upper handle section on the ground behind the
lawn mower with the handle label facing up.
2. Install the lower handle section to the housing with
2 flange-head bolts and 2 nuts (Fig. 2).
m-4272
4
2
3
1
5
6
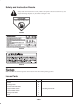
Figure 2
1. Knob (2)
2. Lower handle section
3. Carriage bolt (2)
4. Support bracket (2)
5. Housing
6. Nut (2)
7. Flange-head bolt (2) not
shown
3. Swing the lower handle section back and the support
brackets up, aligning the brackets with the holes in the
handle (Fig. 2).
4. Secure the handle to the support brackets with
2 carriage bolts and 2 knobs, using the height
adjustment holes on the support brackets that best fit
your height (Fig. 2).
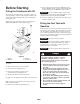
5. Slide the upper handle section ends over the lower
handle section so that the sections nest together (Fig. 3).
1
m-4204
3
4
2
5
Figure 3
1. Knob
2. Contoured-handle bolt
(only one shown)
3. Upper handle section
4. Lower handle section
5. Cables
6. Ensure that the cables are routed below and behind the
lower handle section as illustrated in Figure 3.
7. Secure the upper handle section to the lower handle
section using 2 contoured-handle bolts and 2 knobs
(Fig. 3).
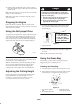
Installing the Starter Rope
Pull the starter rope through the rope guide on the handle
(Fig. 4).
210
2
1
Figure 4
1. Rope guide 2. Starter rope