Form No. 3328-678 Super Recycler Walk Power Lawn Mower Model No. 20036—Serial No. 230000001 and Up Model No. 20037—Serial No. 230000001 and Up Operator’s Manual Para obtener una versión gratis de este manual en español, escriba a la dirección indicada más abajo. Asegúrese de indicar el modelo y el número de serie de su producto. Pour obtenir gratuitement une version en français de ce manuel, écrivez à l’adresse ci–dessous. N’oubliez pas d’indiquer les numéros de modèle et de série de votre produit.
Warning Adjusting the Cutting Height . . . . . . . . . . . . . . . . Using the Grass Bag . . . . . . . . . . . . . . . . . . . . . . . Operating Tips . . . . . . . . . . . . . . . . . . . . . . . . . . . Maintenance . . . . . . . . . . . . . . . . . . . . . . . . . . . . . . . . Recommended Maintenance Schedule . . . . . . . . . Checking the Engine Oil Level . . . . . . . . . . . . . . Cleaning under the Housing . . . . . . . . . . . . . . . . . Replacing the Air Filter . . . . . . . . . . . . . . . . . .
Write the product model and serial numbers in the space below: This is the safety alert symbol. It is used to alert you to potential personal injury hazards. Obey all safety messages that follow this symbol to avoid possible injury or death. Model No. Improperly using or maintaining this lawn mower can result in injury. To reduce the potential for injury, comply with these safety instructions. Serial No.
• Stop the blade(s) if you must tilt the lawn mower for transportation when crossing surfaces other than grass and when transporting the lawn mower to and from the area to be mowed. • While mowing, always wear substantial footwear and long trousers. • Do not operate the lawn mower when barefoot or wearing open sandals. • Always wear safety goggles or safety glasses with side shields when operating the lawn mower.
• To ensure the best performance and safety, purchase only genuine Toro replacement parts and accessories. Slopes are a major factor related to slip and fall accidents which can result in a severe injury. If you feel uneasy on a slope, do not mow it. • Maintain or replace safety and instruction decals when necessary. • Watch for holes, ruts, or bumps. Tall grass can hide obstacles. • Do not mow near drop-offs, ditches, or embankments. You could lose your footing or balance. • Do not mow on wet grass.
Safety and Instruction Decals Safety decals and instructions are easily visible to the operator and are located near any area of potential danger. Replace any decal that is damaged or lost. 99-6018 43-8480 93-0248 Setup Note: Determine the left and right sides of the machine from the normal operating position. Loose Parts DESCRIPTION QTY.
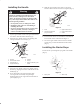
Installing the Handle 5. Slide the upper handle section ends over the lower handle section so that the sections nest together (Fig. 3). Warning 2 1 Folding or unfolding the handle improperly can pinch, stretch, or damage one or more of the cables. Any pinched, stretched, or damaged cable may cause an operational failure that results in an unsafe operating condition. 3 4 • Do not pinch, stretch, or damage the cables. • Handle the cables with care when folding or unfolding the handle.
7. If the oil level reading is below the Add mark on the dipstick, slowly pour only enough oil into the filler hole to raise the oil level to the Full mark on the dipstick. Before Starting Filling the Crankcase with Oil Important Do not overfill the crankcase with oil and run the engine; engine damage will result. Drain the excess oil until the oil level on the dipstick reads Full. The crankcase can hold 20 ounces (0.59 liters) of oil.
Operation Danger Note: Determine the left and right sides of the machine from the normal operating position. When fueling, under certain circumstances, a static charge can develop, igniting the gasoline. A fire or explosion from gasoline can burn you and others and damage property. Each time before you mow, make sure that the self-propel drive and the blade control bail operate properly. When you release the blade control bail, the engine and the blade should stop.
4. Pull the starter handle lightly until you feel resistance, then pull it sharply (Fig. 6). Allow the rope return to the handle slowly. Danger Adjusting the cutting height levers could bring your hands into contact with a moving blade and result in serious injury. Note: Allow the engine to warm up for at least one minute; longer in cooler temperatures. Note: If the engine fails to start after 3 attempts, repeat steps 2 through 4.
3. Slide the hole in the bag frame onto the retaining post on the discharge tunnel (Fig. 10). 2. Pull the discharge door handle up and out of the bag notch (Fig. 11) and pull it forward until it engages the catch (Fig. 10). 4. Set the rear of the bag frame onto the lower handle. 3. Remove the bag from the mower and empty the grass. 5.
• If there are more than 5 inches (12.7 cm) of leaves on the lawn, set the front cutting height one or 2 notches higher than the rear cutting height. This makes it easier to feed the leaves under the housing. Warning Operating a lawn mower with its engine running at a speed greater than the factory setting can cause the lawn mower to throw a part of the blade or engine into the operator’s or bystander’s area and result in serious personal injury or death.
Maintenance Note: Determine the left and right sides of the machine from the normal operating position. Recommended Maintenance Schedule Maintenance Service Interval Each Use 2Change • Check the engine oil level. Refer to Checking the Engine Oil Level on page 14. • Check the stopping time of the blade brake. The blade must stop within 3 seconds of releasing the bail; if it does not, contact an Authorized Service Dealer for repair. • Remove grass clippings and dirt from under the housing.
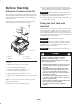
Scraping Method Checking the Engine Oil Level Before you use the lawn mower, ensure that the oil level is between the Add and the Full marks as shown on the dipstick (Fig. 5). If the oil level is below the Add mark, add oil. Refer to Filling the Crankcase with Oil on page 8. Warning Tipping the lawn mower may cause the fuel to leak from the carburetor or the fuel tank. Gasoline is extremely flammable, highly explosive and under certain conditions can cause personal injury or property damage.
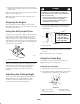
Changing the Engine Oil 3. Loosen the screw that secures the air filter cover to the engine (Fig. 13). Change the oil after the first 5 operating hours and then after every 50 hours or every season. Run the engine just before changing the oil to warm the oil. Warm oil flows better and carries more contaminants. 1 Note: Change the oil after every 25 hours when operating under a heavy load or in high temperatures. 1. Disconnect the wire from the spark plug (Fig. 7). 3 2 1003 2.
Note: For the best performance, install a new blade before the cutting season begins. During the year, file down any small nicks to maintain the cutting edge. Warning Tipping the lawn mower may cause the fuel to leak from the carburetor or the fuel tank. Gasoline is extremely flammable, highly explosive and under certain conditions can cause personal injury or property damage.
Balancing the Blade 2. Remove the cover (Fig. 21). 1. Check the balance of the blade by placing the center hole of the blade over a nail or screwdriver shank clamped horizontally in a vise (Fig. 20). 2 1 281 1007 Figure 21 Figure 20 1. Belt cover Note: You can also check the balance using a commercially manufactured blade balancer. 2. Bolts 3. Loosen the cable support nut (Fig. 22). 1 2.
Lubricating the Self-propel Drive 7. Start the engine again to ensure that all the gasoline is out of the carburetor. 1. Wipe the grease fittings on the rear cutting height levers with a clean rag (Fig. 24). Folding the Handle Warning 1 Folding or unfolding the handle improperly can pinch, stretch, or damage one or more of the cables. Any pinched, stretched, or damaged cable may cause an operational failure that results in an unsafe operating condition.
Storage 2. Clean any dirt and chaff from the cylinder, cylinder head fins, and blower housing. To prepare the lawn mower for off-season storage, perform the recommended maintenance procedures. Refer to Maintenance on page 13. 3. Remove grass clippings, dirt, and grime from the external parts of the engine, the shrouding, and the top of the housing. Store the lawn mower in a cool, clean, dry place. Cover the lawn mower to keep it clean and protected. 4. Check the condition of the blade.
Accessories • Side discharge kit You may purchase the following accessories from an Authorized Service Dealer: • Spark arrestor • Dethatcher kit Troubleshooting Toro designed and built your lawn mower for trouble-free operation. Check the following components and items carefully, and refer to Maintenance on page 13 for more information. If a problem continues, contact an Authorized Service Dealer.
Problem Lawn mower or engine vibrates excessively Uneven cutting pattern Discharge chute plugs Lawn mower does not self-propel Possible Causes Corrective Action 1. The blade is bent or is out of balance. 1. Balance the blade. If the blade is bent, replace it. 2. The blade bolt is loose. 2. Tighten the blade bolt. 3. The underside of the housing contains clippings and debris. 3. Clean under the housing. 4. The engine mounting bolts are loose. 4. Tighten the engine mounting bolts. 1.
The Toro Starting Guarantee A Five-Year Full Warranty on All Toro GTS-5 Engines Conditions and Products Covered The Toro Company and its affiliate, Toro Warranty Company, pursuant to an agreement between them, jointly guarantee that your Toro Engine will start on the first or second pull for five years from the date of purchase—if you provide the routine maintenance it requires—or we will fix it free of charge. This warranty covers the cost of parts and labor, but you must pay transportation costs.
Date Hours Used Air Cleaner Service (mowers only) Change Oil (does not apply to two-cycle) Lubricate Wheels (mowers only) Check Spark Plug Storage Preparation Part No. 374-0018 Rev.
Gas, Cordless, Electric, and 21″ Commercial Duty Walk Mowers The Toro Total Coverage Guarantee A Full Warranty (Limited Warranty for Commercial Use) Conditions and Products Covered Owner Responsibilities The Toro Company and its affiliate, Toro Warranty Company, pursuant to an agreement between them, jointly promise to repair any Toro Product used for normal residential purposes* if defective in materials or workmanship or if it stops functioning due to the failure of a component.