Form No. 3401-792 Rev C 21in Heavy-Duty Recycler®/Rear Bagger Lawn Mower Model No. 22295—Serial No. 316000001 and Up Register at www.Toro.com.
g000502 Figure 2 Introduction 1. Safety-alert symbol This rotary-blade, walk-behind lawn mower is intended to be used by residential homeowners or professional, hired operators. It is designed primarily for cutting grass on well-maintained lawns on residential or commercial properties. It is not designed for cutting brush or for agricultural uses. This manual uses 2 words to highlight information.
Contents Safety Safety ....................................................................... 3 General Safety ................................................... 3 Safety and Instructional Decals .......................... 5 Setup ........................................................................ 7 1 Installing the Handle ........................................ 7 2 Installing the Recoil-Start Rope........................ 9 3 Filling the Crankcase with Oil ...........................
Operation • Never let children or untrained people operate or service the equipment. Local regulations may restrict the age of the operator. • Never run an engine in an enclosed area. • Operate the machine only in good light, keeping • The owner/user can prevent and is responsible for accidents or injuries occurring to themselves, other people, or property. • • Preparation • Use only accessories and attachments approved • by the manufacturer.
• Never allow untrained personnel to service the on Toro genuine parts. When it comes to reliability, Toro delivers replacement parts designed to the exact engineering specifications of our equipment. For peace of mind, insist on Toro genuine parts. machine. • Remove the spark-plug wire before making any repairs. • Use care when checking the blade. Wrap the Hauling blade or wear gloves, and use caution when servicing the blade. Only replace the blade; never straighten or weld it.
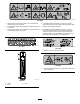
decal116-7583 116-7583 1. Warning–Read the Operator’s Manual. Do not operate this machine unless you are trained. 4. Cutting/dismemberment hazard of hand or foot, mower blade—stay away from moving parts; keep all guards in place. 2. Thrown object hazard—keep bystanders a safe distance from 5. Warning—wear hearing protection. the machine. 3. Thrown object hazard—Do not operate the mower without the 6. Cutting/dismemberment hazard of hand or foot, mower rear discharge plug or bag in place.
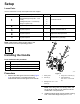
Setup Loose Parts Use the chart below to verify that all parts have been shipped. Procedure 1 2 3 4 5 Description Use Qty. Handle Hex-head-flange bolt (5/16 x 1-1/2 inches) Carriage bolt (5/16 x 1-1/2 inches) Flange nut (5/16 inch) 1 No parts required – Install the starter rope. No parts required – Fill the crankcase with oil. No parts required – Adjust the self-propel drive. No parts required – Assemble the grass bag. 2 Install the handle.
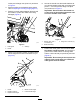
inches) and 2 flange nuts (5/16 inch) as shown in Figure 3. 3. Set the machine to the desired cutting height; refer to Adjusting the Cutting Height (page 13). 4. Route the control cables between the deck and the handle to protect the cables from being damaged (Figure 4). 6. Secure the handle onto the handle brackets at your desired handle height with 2 carriage bolts (5/16 x 1-1/2 inches) and 2 flange nuts (5/16 inch) as shown in Figure 6.
2 3 Installing the Recoil-Start Rope Filling the Crankcase with Oil No Parts Required No Parts Required Procedure Procedure Pull the recoil-start rope through the rope guide on the handle (Figure 7). The engine crankcase is shipped without oil. Before starting the engine, fill the crankcase with oil. The engine crankcase can hold 0.65 L (22 oz) of oil. Use only high-quality SAE 10W-30 weight detergent oil that has the American Petroleum Institute (API) service classification SH, SJ, or equivalent.
• If the oil level is below the lower-limit mark on the dipstick, slowly pour a small amount of oil into the oil-fill tube, wait 3 minutes, and repeat steps 4 through 6 until the oil level is at the Full mark on the dipstick. • If the oil level is above the upper-limit mark on the dipstick, drain the excess oil until the oil level on the dipstick is at the Full mark. Refer to Changing the Engine Oil (page 19).
3. Product Overview Hook the top and side channels of the bag onto the top and sides of the frame, respectively (Figure 10). g024163 Figure 11 1. Handle 7. Spark plug 2. Blade-control bar 8. Cutting-height lever (4) 3. Throttle 10. Grass bag 5. Fuel-tank cap 11. Recoil-start handle 6. Air cleaner 11 9. Oil fill/dipstick 4.
Operation Note: Determine the left and right sides of the machine from the normal operating position. Each time before you mow, ensure that the self-propel drive and the blade-control bar operate properly. When you release the blade-control bar, the blade and the self-propel drive should stop. If they do not, contact an Authorized Service Dealer. CAUTION This machine produces sound levels in excess of 85dBA at the operator's ear and can cause hearing loss through extended periods of exposure.
gasoline may cause performance problems and/or engine damage which may not be covered under warranty. • Do not use gasoline containing methanol. • Do not store fuel either in the fuel tank or in fuel containers over the winter unless you use a fuel stabilizer. • Do not add oil to gasoline. Important: To reduce starting problems, add fuel g024173 Figure 15 stabilizer/conditioner to fresh fuel as directed by the fuel-stabilizer manufacturer. 1.
5. Pull the starter handle lightly until you feel resistance, then pull it sharply. Note: Allow the rope to return slowly to the rope guide on the handle. 6. When the engine starts, move the throttle-control lever to the FAST position (Figure 17). Shutting Off the Engine Release the blade-control bar. Both the engine and the blade should stop within 3 seconds. If they do not, contact an Authorized Service Dealer.
g024172 Figure 21 1. Rear-discharge plug 2. Rear door g024168 Figure 20 1. Handle 2. Blade-control bar in the Run/Drive position WARNING 3. Blade-control bar in the Run/Shift position—about 2.5 cm (1 inch) below the handle 4. Blade-control bar in the Stop position Operating the machine to recycle lawn clippings without the plug in place allows objects to be thrown toward you or bystanders. Also, contact with the blades could occur. Thrown objects or blade contact can cause serious injury or death.
Operating Tips General Tips • Review the safety instructions and read this • • • • g024174 Figure 22 1. Rear door • 3. Notch (2) 2. Bag-rod end (2) • 3. Remove the rear-discharge plug by pushing in the latch with your thumb and pulling the plug out from the machine (Figure 21). • 4. Install the bag-rod ends into the notches at the base of the handle, and rock the bag back and forth to ensure that the bag-rod ends are seated at the bottom of both notches (Figure 22). 5.
grass at the 64 mm (2-1/2 inch), 76 mm (3 inch), or 89 mm (3-1/2 inch) cutting-height settings. Cut only about a third of the grass blade at a time. Do not cut below the 64 mm (2-1/2 inch) setting unless the grass is sparse or it is late fall when grass growth begins to slow down. • When cutting grass over 15 cm (6 inches) tall, first mow at the highest cutting-height setting and walk slower; then mow again at a lower setting for the best lawn appearance.
Maintenance Note: Determine the left and right sides of the machine from the normal operating position. Recommended Maintenance Schedule(s) Maintenance Service Interval Maintenance Procedure After the first 20 hours • Change the engine oil. • Have an authorized engine servicing dealer check and adjust the flywheel brake pad. Before each use or daily • • • • • • Check the engine-oil level. Inspect the air cleaner elements. Inspect the mower blades for wear or damage.
3. 4. Note: Excess oil in the foam element restricts Remove the 2 nuts that secure the cover (Figure 23). the air flow through the element and may reach the paper filter and clog it. Remove the cover. 12. Note: Be careful to prevent dirt and debris from falling into the base of the air cleaner. 5. Remove the foam and paper elements from the base of the air cleaner (Figure 23). 6. Remove the foam element from the paper element (Figure 23).
Servicing the Spark Plug Drive System Maintenance Service Interval: Every 100 hours—Inspect, clean, and adjust the spark plug gap; replace the spark plug if necessary. Adjusting the Self-Propel Drive Use an NGK BPR5ES spark plug or equivalent. 1. Shut off the engine and wait for all moving parts to stop. 2. Disconnect the wire from the spark plug. 3. Clean around the spark plug. 4. Remove the spark plug from the cylinder head.
8. Blade Maintenance For a new traction belt, rotate the drive cable adjustment knob clockwise 1 additional turn to allow for the normal stretching of the belt during the break-in period. Maintaining the Blade Note: You can skip this step if you are adjusting Always mow with a sharp blade. A sharp blade cuts cleanly and without tearing or shredding the grass blades. a used belt. 1. Shut off the engine and wait for all moving parts to stop. 2. Disconnect the wire from the spark plug. 3.
WARNING A worn or damaged accelerator can break, and a piece of the accelerator could be toward you or bystanders, resulting in serious personal injury or death. • Inspect the accelerator periodically for wear or damage. • Replace a worn or damaged accelerator. g002278 Figure 27 1. Sail 2. Flat part of the blade Removing the Blade 3. Wear 4. Slot formed Note: For the best performance, install a new blade before the mowing season begins.
Balancing the Blade 1. Cleaning Check the balance of the blade by placing the center hole of the blade over a nail or screwdriver shank clamped horizontally in a vise (Figure 30). Cleaning under the Machine To ensure the best performance, keep the underside of the machine clean. Be especially careful to keep the kickers free of debris (Figure 31). g002280 Figure 30 Note: You can also check the balance using a commercially manufactured blade balancer. 2.
Note: The blade will draw in water and wash out the clippings. Let the water run until you no longer see clippings being washed out from under the machine. Cleaning under the Belt Cover 4. Shut off the engine and wait for all moving parts to stop. Service Interval: Every 50 hours—Remove grass clippings and debris from under the belt cover. 5. Turn off the water. 1. 6. Start the machine and let it run for a few minutes to dry out the underside of the machine.
Storage To prepare the machine for off-season storage, perform the recommended maintenance procedures; refer to Maintenance (page 18). Store the machine in a cool, clean, dry place. Cover the machine to keep it clean and protected. Preparing the Fuel System WARNING Gasoline can vaporize if you store it over long periods of time and explode if it comes into contact with an open flame. • Do not store gasoline over long periods of time.
2. Clean any dirt and chaff from the cylinder, cylinder head fins, and blower housing. 3. Remove grass clippings, dirt, and grime from the external parts of the engine, the shrouding, and the top of the mower housing. 4. Check the condition of the blade; refer to Inspecting the Blade (page 21). 5. Service the air cleaner; refer to Servicing the Air Cleaner (page 18). 6. Tighten all nuts, bolts, and screws. 7.
Troubleshooting Problem The engine does not start. The engine starts hard or loses power. Possible Cause 1. The fuel tank is empty or the fuel system contains stale fuel. 1. Drain and/or fill the fuel tank with fresh gasoline. If the problem persists, contact an Authorized Service Dealer. 2. The throttle lever is not in the Choke position. 3. The wire is not connected to the spark plug. 4. The spark plug is pitted, fouled, or the gap is incorrect. 2. Move the throttle lever to the Choke position. 3.
The Toro Warranty Landscape Contractor Equipment (LCE) A Limited Warranty (see warranty periods below) Conditions and Products Covered The Toro Company and its affiliate, Toro Warranty Company, pursuant to an agreement between them, jointly promise to the original purchaser to repair the Toro Products listed below if defective in materials or workmanship.