
Operator's Manual


Maintenance
27
2. Open the hood; refer to Opening the Hood,
page 23.
3. Clean around the air cleaner to prevent dirt from
getting into the engine and causing damage.
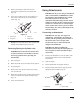
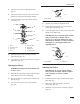
4. Unscrew the knob and remove the air cleaner
cover (Fig. 24).
1
2
m–4653
3
4
6
87
5
Figure 24
1. Knob
2. Air cleaner cover
3. Cover nut
4. Cover
5. Foam pre-filter
6. Paper filter
7. Rubber seal
8. Air cleaner base
5. Carefully slide the foam pre-filter off of the
paper element (Fig. 24).
6. Unscrew the cover nut and remove the cover and
paper filter (Fig. 24).
Cleaning the Filters
IMPORTANT: Replace the foam element if it
is torn or worn.
1. Wash the foam pre-filter in liquid soap and warm
water. When clean, rinse it thoroughly.
2. Dry the pre-filter by squeezing it in a clean cloth
(do not wring).
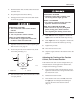
3. Put one or two ounces of oil on the pre-filter
(Fig. 25).
2
m–1213
1
Figure 25
1. Foam element 2. Oil
4. Squeeze the pre-filter to distribute the oil.
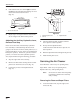
5. Lightly tap the paper filter on a flat surface to
remove dust and dirt (Fig. 26).
6. Inspect the paper filter for tears, an oily film, and
damage to the rubber seal.
IMPORTANT: Never clean the paper element
with pressurized air or liquids, such as
solvent, gas, or kerosene. Replace the paper
element if it is damaged, or cannot be cleaned
thoroughly (i.e., after approximately 100
operating hours).
1
m–1213
2
Figure 26
1. Paper element 2. Rubber seal
Installing the Filters
IMPORTANT: To prevent engine damage,
always operate the engine with the complete
foam and paper air cleaner assembly
installed.
1. Carefully slide the foam pre-filter onto the paper
filter (Fig. 24).
2. Place the air cleaner assembly onto the air
cleaner base (Fig. 24).
3. Install the cover and secure it with the wingnut
(Fig. 24).