
Operator's Manual


25
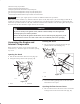
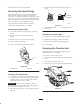
3. Put one or two ounces of oil on the pre-filter (Fig. 29).
2
m–1213
1
Figure 29
1. Foam element 2. Oil
4. Squeeze the pre-filter to distribute the oil.
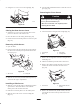
5. Lightly tap the paper filter on a flat surface to remove
dust and dirt (Fig. 30).
6. Inspect the paper filter for tears, an oily film, and
damage to the rubber seal.
Important Never clean the paper element with
pressurized air or liquids, such as solvent, gas, or
kerosene. Replace the paper element if it is damaged, or
cannot be cleaned thoroughly (i.e., after approximately
100 operating hours).
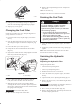
1
m–1213
2
Figure 30
1. Paper element 2. Rubber seal
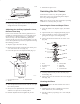
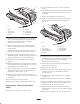
Installing the Filters
Important To prevent engine damage, always operate
the engine with the complete foam and paper air cleaner
assembly installed.
1. Carefully slide the foam pre-filter onto the paper filter
(Fig. 28).
2. Place the air cleaner assembly onto the air cleaner base
(Fig. 28).
3. Install the cover and secure it with the wingnut
(Fig. 28).
4. Install the air cleaner cover and secure with the knob
(Fig. 28).
5. Close the hood.
Servicing the Engine Oil
Change oil after the first 50 operating hours and then
every 100 operating hours thereafter.
Note: Change oil more frequently when operating
conditions are extremely dusty or sandy.
Oil Type: Detergent oil (API service SG, SH, SJ, or
higher)
Crankcase Capacity: w/filter, 2.1 qt. (2 l)
Viscosity: See table below
F
–20 0 20
40 60
80 100
°
C
–30
°
–20 –10
01020
30 40
USE THESE SAE VISCOSITY OILS
32
5W-20, 5W-30
10W-30, 10W-40
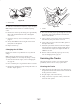
Changing the Oil
1. Start the engine and let it run for five minutes. This
warms the oil so it drains better.
2. Park the traction unit so that the drain side is slightly
lower than the opposite side to ensure that the oil
drains completely.
3. Lower the loader arms, set the parking brake, stop the
engine, and remove the key.
Components will be hot if the traction unit has
been running. If you touch hot components you
may be burned.
Allow the traction unit to cool before performing
maintenance or touching components under the
hood.
Caution
4. Remove the drain plug (Fig. 31).