
Operator's Manual


31
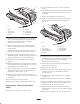
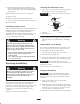
7. Apply a thin coat hydraulic fluid to the rubber gasket
on the replacement filter.
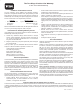
8. Install the replacement hydraulic filter onto the filter
adapter (Fig. 43). Tighten it clockwise until the rubber
gasket contacts the filter adapter, then tighten the filter
an additional 3/4 turn.
1
m–5920
Figure 43
1. Hydraulic filter
9. Clean up any spilled fluid.
10. Start the engine and let it run for about two minutes to
purge air from the system.
11. Stop the engine and check for leaks.
Hydraulic fluid escaping under pressure can
penetrate skin and cause injury. Fluid injected
into the skin must be surgically removed within a
few hours by a doctor familiar with this form of
injury or gangrene may result.
• Keep your body and hands away from pin hole
leaks or nozzles that eject high pressure
hydraulic fluid.
• Use cardboard or paper to find hydraulic leaks,
never use your hands.
Warning
12. Check the fluid level in the hydraulic tank (refer to
Checking the Hydraulic Fluid, page 13) and add fluid
to raise the level to mark on dipstick. Do not over fill
the tank.
13. Install the front screen, refer to Removing the Front
Screen, page 22.
14. Close the hood.
Changing the Hydraulic Fluid
Change the hydraulic fluid after every 400 operating hours
or yearly.
1. Position the traction unit on a level surface.
2. Open the hood, refer to Opening the Hood, page 21.
3. Install the cylinder lock, stop the engine, and remove
the key.
4. Allow the traction unit to cool completely.
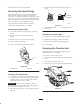
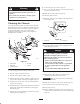
5. Remove the hydraulic tank cap and dipstick (Fig. 44).
Note: The filler cap is behind the front screen. If you
want to improve your access to it, remove the screen;
refer to Removing the Front Screen, page 22.
1
m–5377
2
Figure 44
1. Filler neck cap 2. Dipstick
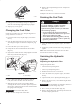
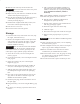
6. Place a large drain pain (capable of holding 15
gallons) under the drain plug on the front of the
traction unit (Fig. 45).
Note: The drain plug is located behind the front
weight, under the muffler.
m-5376
1
Figure 45
1. Drain Plug
7. Remove the drain plug and allow the oil to drain into
the pan (Fig. 45).
8. When finished, install and tighten the drain plug.
Note: Dispose of the used oil at a certified recycling
center.