
Operator's Manual


33
Charging the battery produces gasses that can
explode.
Never smoke near the battery and keep sparks
and flames away from battery.
Warning
Cleaning the Chassis
Over time, the chassis under the engine collects dirt and
debris that must be removed. Using a flashlight, open the
hood and inspect the area under the engine on a regular
basis. When the debris is one to two inches deep,
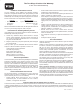
complete the following procedure (refer to Figure 47
throughout this procedure):
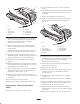
m–4773
4
1
2
1
3
5
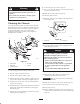
Figure 47
1. Side weights
2. Rear panel
3. Fuel tank bracket
4. Fuel tank
5. Chassis
1. Lift and support the front of the traction unit.
2. Stop the engine and remove the key.
3. Disconnect the negative battery cable.
4. Remove the bolts, washers, and lock washers securing
the two side weights, removing the weights (Fig. 47).
5. Open the rear access cover; refer to Opening the Rear
Access Cover, page 21.
6. Remove the three carriage bolts and washers from the
battery base and the fuel tank bracket, removing the
bracket (Fig. 47).
7. Remove the six nuts and bolts securing the rear panel,
removing the panel (Fig. 47).
8. Loosen the tank cap to relieve pressure.
9. Place a clamp on the fuel line, two inches from where
it comes out of the fuel tank.
10. Slide the fuel tank to the rear (Fig. 47).
11. Disconnect the fuel line.
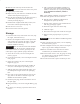
12. Disconnect the two wires leading to the right side of
the tank (Fig. 48).
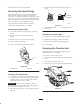
m–4776
1
2
Figure 48
1. Black wire 2. Orange wire
13. Carefully remove the tank and set it upright to keep
from spilling the gasoline.
Danger
In certain conditions, gasoline is extremely
flammable and highly explosive. A fire or
explosion from gasoline can burn you and others
and can damage property.
• Remove the fuel tank outdoors in an open area.
Wipe up any gasoline that spills.
• Do not remove the fuel tank near an open flame
or where gasoline fumes may be ignited by a
spark.
• Do not smoke while handling the fuel tank.
14. Remove any large deposits of debris.
15. Wash out the chassis with water until the water
running out the back of the unit is clear.
Important Take care not to get water into the engine
or electrical components.
16. Slide the fuel tank part way into the chassis (Fig. 47).
17. Connect the fuel line and remove the clamp.
18. Secure the tank cap.
19. On the right side of the tank, connect the orange wire
to the center post and the black wire to the outside post
(Fig. 48).