
Operator's Manual


24
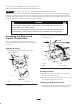
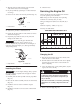
6. Remove the shoulder bolts and nuts securing the oil
cooler to the top of the front screen (Fig. 22).
7. Remove the front screen.
m–5921
2
4
4
1
3
Figure 22
1. Nut
2. Oil cooler
3. Front screen
4. Shoulder bolts
8. When finished, install the front screen with the 4 bolts
removed previously.
9. Install the oil cooler to the front screen with the 4
shoulder bolts and nuts removed previously.
10. Slide the front screen between the frame and the front
weight and secure it to the grill using the carriage bolts
and nuts removed previously (Fig. 20).
11. Tighten the bolts securing the front weight (Fig. 20).
12. Install the side screens and close the hood.
Adjusting the Controls
The factory adjusts the controls before shipping the
traction unit. However, after many hours of use, you may
need to adjust the neutral position of the traction control,
the tracking of the traction control in the full forward
position, and the reverse flow stop of the auxiliary
hydraulics lever.
Adjusting the Traction Control Neutral
Position
If the traction unit creeps forward or backward when the
traction control is in neutral and the unit is warm,
immediately complete the following procedure:
1. Park the traction unit on a flat surface and lower the
loader arms.
2. Stop the engine and remove the key.
3. Lift/support the traction unit so that both tracks are off
of the ground.
4. Open the rear access cover; refer to Opening the Rear
Access Cover, page 22.
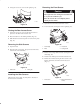
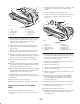
5. Loosen the jam nuts on the traction rods, under the
control panel (Fig. 23).
m–4770
2
1 1
2
Figure 23
1. Traction rod 2. Jam nut
6. Start the traction unit and set the throttle to about 1/3
open position.
When the traction unit is running, you could be
caught and injured in moving parts or burned on
hot surfaces.
Stay away from pinch points, moving parts, and
hot surfaces when adjusting the running traction
unit.
Warning
7. If the left track moves, lengthen or shorten the right
traction rod until the track stops moving.
8. If the right track moves, lengthen or shorten the left
traction rod until the track stops moving.
9. Tighten the jam nuts.
10. Close the rear access cover.
11. Stop the engine and lower the traction unit to the
ground.
Adjusting the Tracking of the Traction
Control, Full Forward Position
If the traction unit does not drive straight when you hold
the traction control against the reference bar, complete the
following procedure:
1. Drive the traction unit with the traction control against
the reference bar, noting which direction the traction
unit veers.
2. Release the traction control.
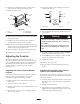
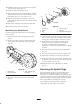
3. If the traction unit veers to the left, loosen the the
right jam nut and adjust the tracking set screw on the
front of the traction control (Fig. 24).