
Operator's Manual


25
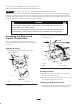
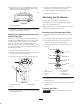
4. If the traction unit veers to the right, loosen the the
left jam nut and adjust the tracking set screw on the
front of the traction control (Fig. 24).
m–4664
1
1
Figure 24
1. Jam nut and set screw
5. Repeat steps 1 through 4 until the traction unit drives
straight in the full forward position.
Adjusting the Auxiliary Hydraulics Lever,
Reverse Flow Stop
In the reverse flow slot of the auxiliary hydraulics lever
assembly is a bolt that keeps the lever from going too far
into the slot into a detent position (i.e., a position that
allows it to stay in the slot without being held by the
operator). If the lever goes into a detent position, or if the
reverse flow hydraulics speed is slow, adjust the bolt using
the following procedure:
1. Stop the engine and remove the key.
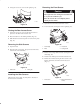
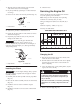
2. Remove the three bolts securing the left control panel
cover and remove the cover (Fig. 25).
3. Loosen the jam nut on the adjustment bolt (Fig. 25).
m–4777
2
3
1
Figure 25
1. Left control panel cover
2. Jam nut
3. Adjustment bolt
4. Turn the adjustment bolt clockwise until the lever slips
into a detent position.
5. Slowly turn the adjustment bolt counter-clockwise
until the lever slips out of a detent position.
6. Hold the adjustment bolt and tighten the jam nut.
7. Install the left panel cover.
Servicing the Air Cleaner
Foam Pre-filter: Clean every 25 operating hours.
Paper Filter: Clean every 25 operating hours. Replace
after every 100 operating hours.
Note: Service the air cleaner more frequently if operating
conditions are extremely dusty or sandy.
Removing the Foam and Paper Filters
1. Lower the loader arms, stop the engine, and remove
the key.
2. Open the hood; refer to Opening the Hood, page 22.
3. Clean around the air cleaner to prevent dirt from
getting into the engine and causing damage.
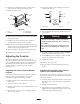
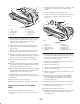
4. Unscrew the knob and remove the air cleaner cover
(Fig. 26).
1
2
m–4653
3
4
6
87
5
Figure 26
1. Knob
2. Air cleaner cover
3. Cover nut
4. Cover
5. Foam pre-filter
6. Paper filter
7. Rubber seal
8. Air cleaner base
5. Carefully slide the foam pre-filter off of the paper
element (Fig. 26).
6. Unscrew the cover nut and remove the cover and paper
filter (Fig. 26).
Cleaning the Filters
Important Replace the foam element if it is torn or
worn.