
Service Manual

121PW / PY Series
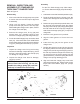
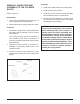
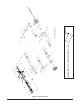
Refer to Figure 14.
Disassembly
1. Remove the thrust bearing and race (17).
Inspection
1. Inspect the running surface of the bearing race
for damage (17), nicks or unusual wear patterns.
The running surface may show evidence of
minor abrasion. This will be normal wear.
Inspect the bearings for free movement. Inspect
the bearing cage for distortion or damage.
Replace if necessary.
Assembly
1. Install thrust bearing and race assembly (17).
REMOVAL, INSPECTION AND
ASSEMBLY OF THRUST BEARING
NOTE: The difference in race thickness-
es: The thin race seats into the swash-
plate. The thicker race will be installed
toward the piston noses.
Figure 14. PW / PY Pump Thrust Bearing
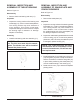
Refer to Figure 15.
Disassembly
1. Remove the swashplate (31).
Inspection
1. Inspect the running surface of the bearing pocket
for damage (31), nicks or unusual wear patterns.
The running surface may show evidence of
minor abrasion. This is normal wear. Inspect
the cradle bearing side of the swashplate (31)
for damage. Replace if necessary.
2. Inspect the cradle bearings attached to the inside
of the housing (15) for normal wear patterns,
placement, and insure they are staked in place.
If damaged, replace housing (15).
REMOVAL, INSPECTION AND
ASSEMBLY OF SWASHPLATE AND
CRADLE BEARINGS
NOTE: The cradle bearings will have
discoloration due to normal wear. Under
normal circumstances, this will not war-
rant replacement.
Figure 15. PW / PY Pump Swashplate and
Cradle Bearings
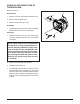
Assembly
1. Install swashplate (31) by holding trunnion arm’s
(13) slot guide (14) with a at tip screwdriver.
Use the screwdriver to hold the slot guide (14)
in place while positioning the swashplate (31)
onto the cradle bearing in the housing (15).
2. Rotate trunnion arm (13) to assure swashplate
pivoting action.
17
13
14
17
31
15
(Cradle Bearings cannot be
removed from housing as depicted)