
Service Manual


31PC Series
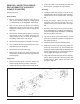
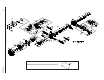
Refer to Figure 12.
Disassembly
1. Remove the block spring (29).
2. Remove the thrust bearing and races (34).
Inspection
1. Inspect and replace the block spring (29) if it is
distorted or broken.
2. Inspect the running surface of the bearing races
for damage, nicks or unusual wear patterns. The
running surface may show evidence of minor
abrasion. This will be normal wear.
Inspect the bearings for free movement. Inspect
the bearing cage for distortion or damage.
Replace if necessary.
Assembly
1. Install thrust bearing and race assembly
(34).
2. Install block spring (29).
REMOVAL, INSPECTION AND
ASSEMBLY OF BLOCK SPRING AND
THRUST BEARING
Figure 12. PC Pump Block Spring and
Thrust Bearing
REMOVAL, INSPECTION AND
ASSEMBLY OF SWASHPLATE AND
CRADLE BEARINGS
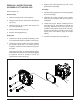
Refer to Figure 13.
Disassembly
Remove the swashplate (32).
Inspection
1. Inspect the running surface of the bearing pocket
of swashplate (32) for damage, nicks or unusual
wear patterns. The running surface may show
evidence of minor abrasion. This is normal wear.
Inspect the cradle bearing side of the swashplate
(32) for damage. Replace if necessary.
2. Inspect the cradle bearings attached to the inside
of the housing (1) for normal wear patterns and
placement, and insure they are staked securely
in place. If the bearings are damaged, replace
housing (1).
NOTE: The cradle bearings will have dis-
coloration due to normal wear. Under
normal circumstances, this will not war-
rant replacement.
Assembly
1. Install swashplate (32) by holding trunnion arm’s
slot guide (38) with a flat tip screwdriver. Use
the screwdriver to hold the slot guide in place
while positioning the swashplate (32) onto the
cradle bearing in the housing (1).
2. Rotate trunnion arm (37) to verify that the
swashplate moves freely.
Figure 13. PC Pump Swashplate and
Cradle Bearings