
Service Manual

20
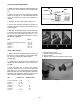
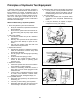
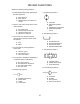
O-ring Face Seal (ORFS)Fittings
1. Make sure both threads and sealing surfaces are
free of burrs, nicks, scratches, or any foreign mate-
rial.
2. Make sure the O-ring is installed and properly
seated in the groove. It is recommended that the
O-ring be replaced any time the connection is
opened.
3. Lubricate the O-ring with a light coating of oil.
4. Put the tube and fitting squarely into position on
the face seal end of the fitting and tighten the nut
until finger tight.
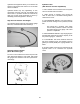
5. Mark the nut and fitting body. Hold the body with
a wrench. Use another wrench to tighten the nut to
the correct flats from finger tight (F.F.F.T.). The
markings on the fittings will verify that the connec-
tion has been tightened
Size F.F.F.T
4 (1/4 in. Nominal hose or tubing) .75 ± .25
6 (3/8 in.) .75 ± .25
8 (1/2 in.) .75 ± .25
10 (5/8 in.) 1.00 ± .25
16 (1 in.) .75 ± .25
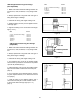
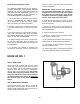
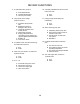
JIC 37º Flare Fittings
1. Make sure both threads and sealing surfaces are
free of burrs, nicks, scratches, or any foreign mate-
rial. Check for a cracked or distorted flare
(sealing point).
2. Tighten the nut finger tight until it bottoms out
against the seat. Mark a line on the nut and the fit-
ting body.
3. Hold the body with a wrench. Use another
wrench to tighten the nut to the correct flats from
finger tight (F.F.F.T.). The markings on the nut and
fitting body will verify that the connection has been
tightened. After tightening, extend the line from the
nut to the body (optional for ease of remake).
Size Initial F.F.F.T. Remake F.F.F.T
4 (1/4 in. Nominal) 2 - 2½ ¾ - 1
6 (3/8 in.) 2 - 2¼ 1
8 (1/2 in.) 1½ - 1¾ 1
10 (5/8 in.) 1½ - 1¾ ¾
12 (3/4 in) 1½ ¾
14 (5/8 in) 2 1¼
16 (1 in.) 1¼ - 1½ ¾ - 1
Figure 3
Figure 4
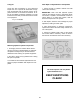
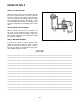
Line tightening procedure:
1. Tighten connection finger tight.
2. Mark connector.
3. Tighten correct number of flats from spec. Chart.
Figure 5
Nut
Sleeve
Body
Seal