
Operator's Manual

22
Using Attachments
Important If you are using an attachment with a serial
number of 200999999 or earlier, the manual for the
attachment may contain information specific to the use of
the attachment with other compact utility loader models,
such as settings for the flow divider control and speed
selector lever and the use of a counterweight on the
traction unit. These systems are built into the TX Compact
Utility Loader, and you should ignore any references to
them.
Connecting an Attachment
Important Use only Toro-approved attachments.
Attachments can change the stability and the operating
characteristics of the traction unit. The warranty of the
traction unit may be voided if used with unapproved
attachments.
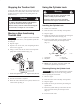
Important Before installing the attachment, ensure
that the mount plates are free of any dirt or debris and that
the pins rotate freely. If the pins do not rotate freely,
grease them; refer to Greasing the Traction Unit, page 34.
1. Position the attachment on a level surface with enough
space behind it to accommodate the traction unit.
2. Start the engine.
3. Tilt the attachment mount plate forward.
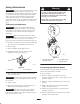
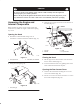
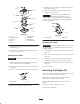
4. Position mount plate into the upper lip of the
attachment receiver plate (Fig. 15).
m–4055
1
2
Figure 15
1. Mount plate 2. Receiver plate
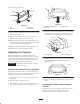
5. Raise the loader arms while tilting back the mount
plate at the same time.
Important The attachment should be raised enough to
clear the ground, and the mount plate should be tilted all
the way back.
6. Stop the engine.
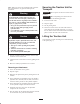
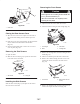
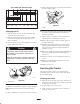
7. Engage the quick attach pins, ensuring that they are
fully seated in the mount plate (Fig. 16).
Important If the pins do not rotate to the engaged
position, the mount plate is not fully aligned with the
holes in the attachment receiver plate. Check the receiver
plate and clean it if necessary.
If you do not fully seat the quick attach pins
through the attachment mount plate, the
attachment could fall off of the traction unit,
crushing you or bystanders.
Ensure that your quick attach pins are fully
seated in the attachment mount plate.
Warning
m–5919
1
3
2
Figure 16
1. Quick attach pins (shown
in engaged position)
2. Disengaged position
3. Engaged position
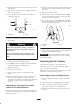
Connecting the Hydraulic Hoses
If the attachment requires hydraulics for operation,
connect the hydraulic hoses as follows:
1. Stop the engine.
2. Move the auxiliary hydraulics lever forward,
backward, and back to neutral to relieve pressure at the
hydraulic couplers.
3. Move the auxiliary hydraulics lever into the reverse
position.
4. Remove the protective covers from the hydraulic
couplers on the traction unit.
5. Ensure that all foreign matter is cleaned from the
hydraulic connectors.
6. Push the attachment male connector into the female
connector on the traction unit.