
Operator's Manual


8
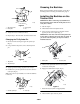
4.
Align the pin holes in the bucket with the mounting
holes in the dipperstick (Fig. 1
1).
5.
Secure the bucket with the pins, bolts, and nuts
removed previously (Fig. 1
1).
m–4589
1
4
3
2
4
Figure
1
1
1. Dipperstick
2. Bucket
pin
3. Bolt
4. Nut
Adjusting
the Seat
CAUTION
POTENTIAL
HAZARD
•
The seat mounting bracket has several pinch
points.
WHA
T CAN HAPPEN
• Y
ou could pinch and/or cut your fingers when
adjusting the seat.
HOW T
O A
V
OID THE HAZARD
• T
ake car
e to keep your fingers away fr
om the
seat mounting bracket when moving the seat up
and down and when lowering the seat into
position.
1.
Stop the engine.
2. T
ilt the seat forward.
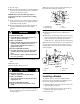
3.
Loosen the knobs on the bottom of the seat (Fig. 12)
and slide the seat forward or back as needed.
4. T
o adjust the seat height, remove the hairpin cotter and
pin from the seat stand (Fig. 12) and raise or lower the
seat as required.
m–4547
3
2
1
Figure
12
1. Seat
2. Knobs
3. Pin
and hairpin cotter
5. When
you have the proper height, install the pin and
hairpin cotter to secure the seat.
Removing
the Backhoe from
the T
raction Unit
1. With
the backhoe secured in the transport position
(refer to Preparing for T
ransport, page 12), move the
backhoe to a level storage area and stop the engine.
2.
Remove the hairpin cotters and pins securing the side
bars and remove the side bars.
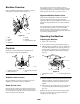
3.
Pin the side bars in the storage positions as illustrated
in Figure 13.
m–4590
Figure
13
4. Start
the engine.
5.
Remove the linch pins securing the links and remove
the links.
Note:
Y
ou may need to adjust the tilt lever slightly to
loosen the links.