Form No. 3364-916 Rev A Trench Filler Compact Utility Loader Model No. 22472—Serial No. 310000001 and Up To register your product or download an Operator's Manual or Parts Catalog at no charge, go to www.Toro.com.
This product complies with all relevant European directives, for details please see the separate product specific Declaration of Conformity (DOC) sheet. This manual identifies potential hazards and has safety messages identified by the safety alert symbol (Figure 2), which signals a hazard that may cause serious injury or death if you do not follow the recommended precautions. DANGER There may be buried power, gas, and/or telephone lines in the work area. Shock or explosion may occur if you dig into them.
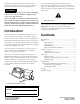
Safety WARNING When the engine is off, attachments in the raised position can gradually lower. Someone nearby may be pinned or injured by the attachment as it lowers. Improper use or maintenance by the operator or owner can result in injury. To reduce the potential for injury, comply with these safety instructions and those in the traction unit Operator’s Manual. Always pay attention to the safety alert symbol, which means Caution, Warning, or Danger—personal safety instruction.
• Never operate the machine at high transport speeds on slippery surfaces. Look behind and use care when moving in reverse. • Never allow anyone in front of the unit. • Disengage power to the auger when the trench filler is transported or not in use. • Never operate the trench filler without good visibility or light. • Lightning can cause severe injury or death. If lightning is seen or thunder is heard in the area, do not operate the machine; seek shelter.
Safety and Instructional Decals are ever needed, contact your Authorized Toro Service Dealer. • To ensure the best performance and safety, purchase only genuine Toro replacement parts and accessories to keep the Toro all Toro. Do not use “Will Fit” replacement parts and accessories as they could cause a safety hazard. Safety decals and instructions are easily visible to the operator and are located near any area of potential danger. Replace any decal that is damaged or lost.
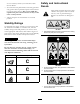
Product Overview 1 2 3 4 g013187 107-9378 5 Figure 3 1. For more information read the Operator’s Manual. 2. Keep the center arrow on the trench filler attachment decal centered over the trench when operating. 1. Float guide 2. Hydraulic lines 3. Auger 4. Bearing 5. Skid (2) Specifications Note: Specifications and design are subject to change without notice.
Operation Refer to your traction unit Operator’s Manual for more information on installing and removing attachments on your traction unit. Important: Always use the traction unit to lift and move the attachment. Filling a Trench g013188 Figure 4 1. Start the engine. 2. Pull the auxiliary hydraulics lever to the reference bar to engage the trench filler. 3. Slowly lower the trench filler to the ground so that the auger is just above the ground.
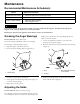
Maintenance Recommended Maintenance Schedule(s) Maintenance Service Interval Before each use or daily Maintenance Procedure • Check the bolts and nuts securing the auger. Every 200 hours • Grease the auger bearings. Yearly or before storage • Adjust the skids as needed. • Paint chipped surfaces. CAUTION If you leave the key in the ignition switch, someone could start the engine. Accidental starting of the engine could seriously injure you or other bystanders.
Storage 1. Before long term storage, wash the attachment with mild detergent and water to remove dirt and grime. 2. Grease the auger bearings. 3. Check and tighten all bolts, nuts, and screws. Repair or replace any damaged or worn part. 4. Ensure that all hydraulic couplers are connected together to prevent contamination of the hydraulic system. 5. Paint all scratched or bare metal surfaces. Paint is available from your Authorized Service Dealer. 6.
Troubleshooting Problem The attachment does not operate. Possible Cause Corrective Action 1. A hydraulic coupler is not completely connected 1. Check and tighten all couplers. 2. A hydraulic coupler is damaged. 2. Check the couplers and replace any that are damaged. 3. Find and remove the obstruction. 3. There is an obstruction in a hydraulic hose. 4. A hydraulic hose is kinked. 5. The auxiliary valve on the traction unit is not opening. 10 4. Replace the kinked hose 5. Repair the valve.
Notes: 11
Toro Compact Utility Equipment Warranty A One-Year Limited Warranty Conditions and Products Covered The Toro® Company and its affiliate, Toro Warranty Company, pursuant to an agreement between them, jointly warrant your Toro Compact Utility Equipment (“Product”) to be free from defects in materials or workmanship.