Form No. 3353-857 Rev A Vibratory Plow for Compact Utility Loaders Model No. 22910—200000001 & Up Operator’s Manual Register your product at www.Toro.
Contents Introduction . . . . . . . . . . . . . . . . . . . . . . . . . . . . . . . . Safety . . . . . . . . . . . . . . . . . . . . . . . . . . . . . . . . . . . . . Sound Pressure Level . . . . . . . . . . . . . . . . . . . . . . Vibration Level . . . . . . . . . . . . . . . . . . . . . . . . . . Safety Decals . . . . . . . . . . . . . . . . . . . . . . . . . . . . Specifications . . . . . . . . . . . . . . . . . . . . . . . . . . . . . . . Stability Ratings . . . . . . . . . . . . . . . . . . . . . . . .
WARNING WARNING POTENTIAL HAZARD • If you do not fully seat the attachment locking pins in the attachment mount plate holes, the attachment could fall off of the traction unit. POTENTIAL HAZARD • When the plow is out of the ground, bystanders could be injured by the swinging plow. • The traction unit could be overturned by the inertia of the swinging plow. WHAT CAN HAPPEN • The attachment could fall rearward onto the operator, severely injuring him or her.
Safety Decals 1 3 2 the table below, then find the degree of slope for the same rating and orientation in the Stability Data section of the traction unit operator’s manual. 4 6 5 # 100–4650 # 100–4649 4. Pinching/crushing hazard—foot 5. Do not dig in areas with underground utility lines 6. Keep bystanders away Specifications Note: Specifications and design are subject to change without notice. Width 29 inches (73.
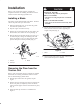
Installation CAUTION Refer to your traction unit Operator’s Manual for complete instructions on installing attachments onto the traction unit and connecting hydraulic hoses. POTENTIAL HAZARD • The blade is sharp and has pinch points. WHAT CAN HAPPEN • The blade can swing and pinch or crush hands or feet. Installing a Blade HOW TO AVOID THE HAZARD • Wear gloves and work boots and securely hold the blade. Toro offers several different blades and pullers.
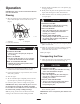
Operation 7. Pull the auxiliary hydraulics lever to the operator grip to engage the plow. IMPORTANT: Always use the traction unit to lift and move the attachment. 8. Slowly lower the plow into the ground to the desired depth, while moving the traction unit backward. Plowing 9. When finished, release the auxiliary hydraulics lever to stop the plow. 1. Move the lynch pins to the outside holes on the spring rods to allow the plow to move from side to side (Fig. 4).
Gauging Plow Depth When plowing grass covered ground, the gauge will read about an inch lower than the actual depth because of the grass. In this case, lower the plow to the desired coulter depth and note the reading on the gauge. Normally, you will be plowing at the maximum depth set by the blade; however, the plow is also equipped with a gauge to allow you to lift the plow and determine how high above maximum depth you are plowing.
• If your traction unit has tires and you have the agricultural or Sitework Systems tires installed on the traction unit, remove the tires and move the right side tires to the left and the left side tires to the right. This will ensure that the tire tread points to the rear to give you the most traction when using the vibratory plow.
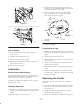
3. Check the clear glass gauge on the side of the gear case (Fig. 12). The gear lube should be at the level of the red dot in the center of the gauge. 4. If the gear lube level is low, remove the fill plug (Fig. 12) and fill the case with gear lube until it is level with the red dot in the gauge. m–4150 Figure 10 1 3 2 m–4147 Figure 12 1. Glass gauge 2. Drain plug 3. Fill plug m–4151 Figure 11 5. Replace the fill plug. Changing Gear Lube How to Grease 1.
Storage 4. Slide the coulter pin through the bracket and coulter and secure it with the coulter pin screw and washer (Fig. 13). 1. Before long term storage, wash the attachment with mild detergent and water to remove dirt and grime. 1 2. Grease the plow. 3. Check gear case lubrication. 4. Check and tighten all bolts, nuts, and screws. Repair or replace any part that is damaged or worn. 2 3 4 5 5.