
Operator's Manual


Important:Neverllthebatterywithdistilled
waterwhilethebatteryisinstalledinthemachine.
Electrolytecouldbespilledonotherpartsand
causecorrosion.
2.Cleanthetopofthebatterywithapapertowel.
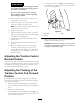
3.Removetheventcapsfromthebattery(Figure43).
4.Slowlypourdistilledwaterintoeachbatterycelluntil
theelectrolytelevelisuptotheupperline(
Figure43)
onthebatterycase.
Important:Donotoverllthebatterybecause
electrolyte(sulfuricacid)cancausesevere
corrosionanddamagetothechassis.
5.Wait5to10minutesafterllingthebatterycells.Add
distilledwater,ifnecessary,untiltheelectrolytelevelis
uptotheupperline(Figure43)onthebatterycase.
6.Installthebatteryventcaps.
ChargingtheBattery
WARNING
Chargingthebatteryproducesgassesthatcan
explode.
Neversmokenearthebatteryandkeepsparksand
amesawayfrombattery.
Important:Alwayskeepthebatteryfullycharged
(1.265specicgravity).Thisisespeciallyimportantto
preventbatterydamagewhenthetemperatureisbelow
0°C(32°F).
1.Removethebatteryfromthechassis;refertoRemoving
theBattery(page30).
2.Checktheelectrolytelevel;referto
Checkingthe
BatteryElectrolyteLevel(page31)
.
3.Makesurethellercapsareinstalledinthebattery.
4.Connecta3to4ampbatterychargertothebattery
postsandchargethebatteryatarateof3to4amperes
for4to8hours(12volts).Donotoverchargethe
battery.
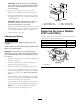
5.Whenthebatteryisfullycharged,unplugthecharger
fromtheelectricaloutlet,thendisconnectthecharger
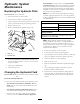
leadsfromthebatteryposts(Figure44).
6.Installthebatteryontothemachineandconnectthe
batterycables,refertoInstallingtheBattery(page31).
Note:Donotrunthemachinewiththebattery
disconnected,electricaldamagemayoccur.
Figure44
1.PositiveBatteryPost
3.Red(+)ChargerLead
2.NegativeBatteryPost
4.Black(-)ChargerLead
ReplacingtheFuses(Models
22973and22974)
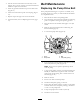
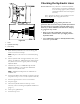
Thereare4fusesintheelectricalsystem.Theyareunderthe
controlpanelontheleftside(Figure45).
StartCircuit
30amp
ChargeCircuit
25amp
CoolerfanCircuit
15amp
Headlight(optional)
15amp
Figure45
1.Fuseblock
32