Form No. 3396-717 Rev A Concrete Breaker Compact Utility Loaders Model No. 23135—Serial No. 230000001 and Up Register at www.Toro.com.
Stability ratings........................................................ 4 Safety and Instructional Decals ................................. 4 Setup ............................................................................ 5 Installing the Bit...................................................... 5 Operation ..................................................................... 6 Converting the Breaker for Vertical Surfaces................ 6 Breaking a Vertical Surface....................................
Safety WARNING During operation, the breaker throws small pieces of broken material and dust. Flying debris may damage eyes. Inhaling the dust can damage lungs. Improper use or maintenance by the operator or owner can result in injury. To reduce the potential for injury, comply with these safety instructions and those in the traction unit Operator's Manual. Always pay attention to the safety alert symbol, which means Caution, Warning, or Danger—personal safety instruction.
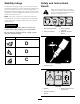
Stability ratings Safety and Instructional Decals To determine the degree of slope you can traverse with the attachment installed on a traction unit, find the stability rating for the hill position you want to travel in the appropriate table below, then find the degree of slope for the same rating and hill position in the Stability Data section of the Operator’s Manual for the traction unit.
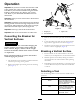
Setup 8. Hold the bit in place and insert the 2 bit-retaining pins into the breaker housing (Figure 2). Refer to the Operator’s Manual for your traction unit for instructions on installing and removing the attachment. 9. Drive the pins into place with a hammer (Figure 2). 10. Insert the 2 elastic pins into the breaker housing and drive them into place over the retaining pins with a hammer (Figure 2) Installing the Bit 11. Grease the bit before use; refer to Greasing the Bit (page 8). 1.
Operation Important: If you have a traction unit other than a TX series traction unit, ensure that you install the Relief Valve Kit on your traction unit before using the breaker. Failure to install the kit may damage your traction unit. Refer to your Authorized Toro Dealer for more information. Important: Always use the traction unit to lift and move the attachment. Important: Continuous penetration in the same location for long periods of time creates high temperatures at the tip of the bit.
Specifications • Do not move the auxiliary hydraulics lever to engage the breaker unless the bit is on the ground and downward pressure is applied. Note: Specifications and design are subject to change without notice.
Maintenance CAUTION If you leave the key in the ignition switch, someone could accidently start the engine and seriously injure you or other bystanders. Remove the key from the ignition before you do any maintenance. Recommended Maintenance Schedule(s) Maintenance Service Interval Maintenance Procedure Before each use or daily • Grease the bit. Grease every 1 to 2 hours of operation and after every washing.. • Inspect and tighten all fasteners.
Charging the Nitrogen Storage Service Interval: Every 500 hours—Check the nitrogen charge in the accumulator. 1. Wash the attachment with mild detergent and water to remove dirt and grime. Inside the breaker is an accumulator, a chamber of pressurized nitrogen. After several hours of use the pressure may decrease, reducing the performance of the breaker. 2. Grease the bit. 3. Check and tighten all bolts, nuts, and screws. 4.
Troubleshooting Problem The breaker does not operate. Possible Cause Corrective Action 1. A hydraulic coupler is not completely connected. 1. Check and tighten all couplers. 2. A hydraulic coupler is damaged. 2. Check all couplers and replace any damaged couplers. 3. Find and remove the obstruction. 3. There is an obstruction in a hydraulic hose. 4. An auxiliary valve on the traction unit does not open. 5. The nitrogen level in the breaker is low. 10 4. Repair the valve. 5.
Notes: 11
The Toro Warranty A limited warranty (see warranty periods below) Conditions and Products Covered The Toro Company and its affiliate, Toro Warranty Company, pursuant to an agreement between them, jointly warrant your Toro Concrete, Masonry, and Compaction Equipment Products listed below to be free from defects in materials or workmanship. This warranty covers the cost of parts and labor, but you must pay transportation costs. for that part.