Form No. 3450-440 Rev A Log Splitter Model No. Model No. Model No. Model No. Register at www.Toro.com. Original Instructions (EN) 22618—Serial No. 404320000 and Up 22618HD—Serial No. 405500000 and Up 23618—Serial No. 400000000 and Up 23618HD—Serial No.
It is a violation of California Public Resource Code Section 4442 or 4443 to use or operate the engine on any forest-covered, brush-covered, or grass-covered land unless the engine is equipped with a spark arrester, as defined in Section 4442, maintained in effective working order or the engine is constructed, equipped, and maintained for the prevention of fire.
Contents Safety Safety ....................................................................... 3 General Safety ................................................... 3 Safety and Instructional Decals .......................... 4 Product Overview ..................................................... 7 Controls ............................................................. 7 Engine Controls .............................................. 7 Specifications ....................................................
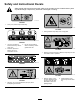
Safety and Instructional Decals Safety decals and instructions are easily visible to the operator and are located near any area of potential danger. Replace any decal that is damaged or missing. decal120-0625 120-0625 1. Pinch point, hand—keep hands away. decal137-0555 137-0555 1. Cutting hazard—keep away from moving parts. decal130-8322 130-8322 1. Use only fuel with an alcohol content by volume under 10%. 3. Do not use fuel with an alcohol content by volume greater than 10%. decal137-0564 2.
decal137-0588 137-0588 1. Warning—read the Operator’s Manual. 3. To lower the rail, 1) Turn the lock lever; 2) Lower the rail; 3) Insert the lock pin. 2. To raise the rail, 1) Remove the lock pin; 2) Raise the rail; 3) Turn the lock lever. decal137-0551 137-0551 1. Warning—read the Operator’s Manual. 4. Cutting hazard—keep away from moving parts. 2. Thrown or flying objects hazard—wear eye protection. 5. Thrown object hazard—keep bystanders away from the machine. 3. Warning—wear protective gloves.
decal145-4972 145-4972 1. Read the Operator’s Manual.
Controls Product Overview Become familiar with all the controls before you start the engine and operate the machine. Engine Controls g312578 Figure 3 1. End plate 6. Rail locking pin 2. Spitting wedge 7. Hydraulic filter 3. Jack lift 8. Hydraulic reservoir 4. Hitch receiver 5. Safety chains 9. Control lever g019744 Figure 4 1. Recoil-start handle 5. Fuel cap 2. Fuel valve 6. Oil dipstick 3. Choke lever 7. Oil-drain plug 4. Throttle lever 8.
Wedge Control Lever • Rotate it to the ON position to start and run the engine. The wedge control lever actuates the hydraulic valve that moves the splitting wedge forward and reverse during the log splitting process. • Rotate it to the OFF position to shut off the engine. • Hold the control lever toward the end plate to move the splitting wedge forward. • Release the control lever to stop the splitting wedge movement. • Move the control lever to the reverse position to retract the splitting wedge.
Operation all times until fueling is complete. Do not use a nozzle lock-open device. • If you spill fuel on your clothing, change your Before Operation clothing immediately. Wipe up any spilled fuel. • Never overfill the fuel tank. Replace the fuel cap and tighten it securely. Before Operation Safety • Store fuel in an approved container and keep it out of the reach of children. Never buy more than a 30-day supply of fuel.
Filling the Fuel Tank Fuel Tank Capacity: 5.3 L (1.4 US gallons) 1. Park the machine on a level surface, shut off the engine, and allow the engine to cool. 2. Clean around the fuel cap and remove it (Figure 7). g020679 Figure 8 1. Maximum fuel level g019799 Figure 7 1. Fuel cap 3. Add fuel to the fuel tank until the level is at the maximum fuel level (Figure 8). 4. Install the fuel cap securely (Figure 7). 5. Wipe up any spilled fuel.
Splitting Safety During Operation • Place your hands on the sides of the log, not on the ends. Never place your hands or any part of your body between a log and any part of the machine. During Operation Safety • Do not straddle or reach across the log-splitting General Safety area when operating the machine. • Use only your hand to push the control lever • The owner/operator can prevent and is responsible forward (toward the log).
Starting the Engine 1. 2. Changing the Rail Position Turn the engine On/Off switch to the ON position (Figure 5). WARNING Move the fuel valve to the OPEN position (Figure 7). The rail is heavy and can suddenly fall onto the machine frame if you release the handle when raising or lowering the rail. Control the rail by the handle, and keep your hands away from the machine frame and pinch points when raising or lowering the rail.
Lowering the Rail to the Horizontal Position 1. Rotate the vertical lock lever to the open position (Figure 11). 2. Carefully rotate the rail into the horizontal position (Figure 11). 3. Install the lock pin to secure the rail (Figure 11). Splitting a Log WARNING This machine is capable of amputating hands and feet. Always stand in the operating area shown in Figure 12. g206500 Figure 12 1. Operating area g206124 Figure 11 1. Park the machine on a level surface. 2.
After Operation After Operation Safety • Shut off the engine, wait for all movement to stop, • • • • g312579 Figure 13 1. Log 3. Endplate—Rail vertical position • 2. Endplate—Rail horizontal position • Important: Never attempt to split logs and allow the machine to cool before adjusting, cleaning, storing, or servicing it. Clean debris from the muffler and engine to help prevent fires. Clean up oil or fuel spills. Allow the engine to cool before storing the machine in any enclosure.
Towing the Machine • Avoid sudden stops and starts. This can cause skidding, or jackknifing. Smooth, gradual starts and stops will improve towing. Before towing the machine, read all of the information and perform all of the applicable procedures in this section to ensure safe and proper towing. • Avoid sharp turns to prevent rolling. Tow only with a vehicle that has a hitch designed for towing. Do not attach towed equipment except at the hitch point.
Hitching the Machine to a Tow Vehicle Connecting the Safety Chains to the Tow Vehicle 1. Shut-off the engine and fuel valve. 1. 2. Lower the rail to the horizontal position and secure it with the lock pin; refer to Lowering the Rail to the Horizontal Position (page 13). Pull the safety chain through the slots in the keyholes so that the lengths on each side are equal. 2. 3. Inspect the tires; refer to Checking the Tire Pressure (page 25). Cross both lengths of chain under the hitch receiver. 4.
Connecting and Checking the Lights 1. Connect the electrical plug of the machine with the electrical plug of the tow vehicle (Figure 17). g020828 Figure 17 Note: The machine uses a standard 4-pin, flat plug. If your tow vehicle has a different type of plug, obtain an adapter from an automotive parts store. 2. Ensure that the tow vehicle is in NEUTRAL, engage the parking brake, and start the engine. 3. Test the lights as follows: A. Turn on the headlights of the tow vehicle.
Maintenance Determine the left and right sides of the machine from the normal operating position. Maintenance Safety • Remove the spark-plug wire before making any repairs. • Before repairing the machine do the following: • Keep your hands and feet away from moving – Park the machine on a level surface. parts. If possible, do not make adjustments with the engine running. – Fully retract the splitting wedge. • Keep all parts in good working condition and all – Shut off the engine.
Pre-Maintenance Procedures Lubrication Disconnecting the Spark-plug Wire Grease type: General-purpose grease Greasing the Rail If the splitting wedge gets stuck on the rail, ensure that the beam is not bent and there is nothing obstructing the path of the wedge, then grease the rail. Lubricate both sides of the beam face. Pull the spark-plug wire off the terminal of the spark plug (Figure 18). g019281 Figure 18 g312577 1. Spark plug Figure 19 1.
Engine Maintenance Greasing the Wheel Bearings Service Interval: Every 500 hours Engine Safety Grease type: General-purpose grease • Shut off the engine before checking the oil or 1. adding oil to the crankcase. Remove the rubber plugs from the axle (Figure 20). • Do not change the governor speed or overspeed the engine. Servicing the Air Cleaner Service Interval: Before each use or daily—Inspect the air-cleaner elements. Every 50 hours—Clean the air-cleaner elements.
9. 10. Rinse and dry the foam element thoroughly. Dip the foam element in clean engine oil, then squeeze out the excess oil. Note: Excess oil in the foam element restricts the air flow through the element and may reach the paper filter and clog it. 11. Wipe dirt from the base and the cover with a moist rag. Note: Be careful to prevent dirt and debris from entering the air duct leading to the carburetor. g019728 Figure 22 1. Cover nut 2. Cover 4. Foam element 5. Paper element 3. Wing nut 6. Base 4.
Servicing the Engine Oil Note: Change the oil more frequently when the operating conditions are extremely dusty or sandy. Engine-Oil Specifications Toro Premium Engine Oil is available from your Authorized Service Dealer. Oil Type: Detergent oil with an API service of SJ or higher. Crankcase Capacity: 1.1 L (1.2 US qt) Viscosity: Refer to the table below. g013375 Figure 23 Checking the Engine-Oil Level Service Interval: Before each use or daily g035136 1.
Servicing the Spark Plug Spark Plug Specifications Type: NGK BPR6ES or equivalent Gap: 0.7 to 0.8 mm (0.028 to 0.031 inch) Note: Use a 21 mm (13/16 inch) spark-plug wrench for removing and installing the spark plug. g206641 Removing the Spark Plug 1. Park the machine on a level surface and shut off the engine. 2. Locate and remove the spark plugs (Figure 27). g031623 Figure 25 5.
Checking the Spark Plug Fuel System Maintenance Service Interval: Every 100 hours/Every 6 months (whichever comes first) Every 300 hours/Yearly (whichever comes first) Cleaning the Fuel-Sediment Cup Important: Do not clean the spark plug(s). Always replace the spark plug(s) when it has: a black coating, worn electrodes, an oily film, or cracks. Service Interval: Every 100 hours/Every 6 months (whichever comes first)—Clean the fuel-sediment cup. Yearly or before storage—Clean the fuel-sediment cup.
10. Align the O-ring into the groove in the sediment cup and install the sediment cup to the fuel-valve housing. 11. Move the lever of the fuel valve to the ON position (all the way to the right) and check for leaks. If it leaks, replace the O-ring. Drive System Maintenance Checking the Tire Pressure Service Interval: Before each use or daily WARNING Failure to maintain correct tire pressure may result in tire failure and loss of control, resulting in property damage and serious injury or death.
Checking the Wheel Lug Nuts Hydraulic System Maintenance Service Interval: After the first hour After the first 10 hours Hydraulic System Safety Yearly • Seek immediate medical attention if fluid is injected into skin. Injected fluid must be surgically removed within a few hours by a doctor. Check and torque the wheel lug nuts to 108 to 122 N∙m (80 to 90 ft-lb).
Replacing the Hydraulic Filter Service Interval: Every 100 hours 1. Park the machine on a level surface, fully retract the splitting wedge, and shut off the engine. 2. Place a drain pan under the filter and replace the filter (Figure 35). g206553 Figure 33 1. Upper notch 2. Breather cap 5. Remove the breather cap (Figure 33). 6. Wipe the dipstick off and thread the breather cap into the reservoir. 7. Remove the dipstick and verify that the fluid is at the upper notch (Figure 33).
Replacing the Hydraulic Fluid Storage Storage Safety Service Interval: Every 100 hours 1. Park the machine on a level surface, fully retract the splitting wedge, and shut off the engine. Allow the machine to cool completely. 2. Place a drain pan under the suction hose connected to the reservoir tank (Figure 36). • Allow the machine to cool before storing. • Do not store the machine or fuel near flames. Storage For storage over 30 days, prepare the machine as follows: 1.
15. Check and tighten all bolts, nuts, and screws. Repair or replace any part that is damaged. 16. Paint all scratched or bare metal surfaces. Paint is available from your Authorized Service Dealer. 17. Store the machine in a clean, dry garage or storage area. 18. Cover the machine to protect it and keep it clean.
Troubleshooting Problem The engine does not start. The engine runs rough. The splitting wedge does not move. The splitting wedge moves slowly. Possible Cause Corrective Action 1. The engine On/Off switch is in the OFF position. 1. Move the switch to the ON position. 2. The fuel-shutoff valve is closed. 3. The choke is open. 4. The fuel tank is empty. 5. The throttle is not in the FAST position. 6. The spark plug wire is loose or disconnected. 2. Open the fuel-shutoff valve. 3.
Notes:
California Proposition 65 Warning Information What is this warning? You may see a product for sale that has a warning label like the following: WARNING: Cancer and Reproductive Harm—www.p65Warnings.ca.gov. What is Prop 65? Prop 65 applies to any company operating in California, selling products in California, or manufacturing products that may be sold in or brought into California.