
Installation Instructions

1
All Rights Reserved
Printed in the USA
W 2006 by The Toro Company
8111 Lyndale Avenue South
Bloomington, MN 55420-1196
Rear Weight Kit
Groundsmaster
)
Traction Units
Part No. 24–5780
Form No. 3355–352 Rev. A
Installation Instructions
Groundsmaster 200 Series
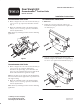
1. Mount a weight to the rear of the traction unit with (2)
1/2–13 x 2–1/4” lg. capscrews, lockwashers and nuts
(Fig. 1).
2. Mount the remaining weight to the mounted weight
with (2) 1/2–13 x 3–1/2” lg. capscrews, lockwashers,
nuts and (4) flatwashers.
Note: Retain any remaining fasteners for future mounting
applications.
Figure 1
Groundsmaster 300 Series
1. Mount a weight to the rear of the traction unit with (2)
1/2–13 x 2–3/4” lg. capscrews, lockwashers,
flatwashers and spacers (Fig. 1). The flatwasher and
spacer are to be positioned between the weight and the
chassis with the flatwasher against the weight.
Note: The (2) nuts are not required on the Groundsmaster
300 series traction units if tapped holes are provided in the
axle support casting.
2. Mount the remaining weight to the mounted weight
with (2) 1/2–13 x 3–1/2” lg. capscrews, lockwashers,
nuts and (4) flatwashers.
Note: Retain any remaining fasteners for future mounting
applications.
Groundsmaster 3280D/3320
2 Wheel Drive
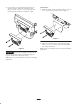
1. Remove the (2) center capscrews, washers and
lockwashers securing the standard rear weight to the
rear frame (Fig. 2).
Figure 2
2. Using the vacated mounting holes in the weight,
mount the weight to the standard rear weight with (2)
1/2–13 x 4–1/2” capscrews and lockwashers (Fig. 3).
Figure 3