
Operator's Manual


3.Slidethebatterytrayoutoftheframe.
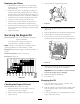
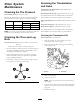
4.Lookatthesideofthebattery.
Note:TheelectrolytemustbeuptotheUpperline
(Figure29).Donotallowtheelectrolytetofallbelow
theLowerline(Figure29).
2
3
1
G003794
Figure29
1.Fillercaps3.Lowerline
2.Upperline
5.Iftheelectrolyteislow,addtherequiredamountof
distilledwater;refertoAddingWatertotheBattery
(page26).
AddingWatertotheBattery
Thebesttimetoadddistilledwatertothebatteryisjust
beforeyouoperatethemachine.Thisallowsthewatermix
thoroughlywiththeelectrolytesolution.
DANGER
Batteryelectrolytecontainssulfuricacidwhichisa
deadlypoisonandcausessevereburns.
•Donotdrinkelectrolyteandavoidcontactwith
skin,eyesorclothing.Wearsafetyglassesto
shieldyoureyesandrubberglovestoprotect
yourhands.
•Fillthebatterywherecleanwaterisalways
availableforushingtheskin.
1.Removethebatteryfromthemachine.
Important:Neverllthebatterywithdistilled
waterwhilethebatteryisinstalledinthemachinet.
Electrolytecouldbespilledonotherpartsand
causecorrosion.
2.Cleanthetopofthebatterywithapapertowel.
3.Removethellercapsfromthebattery(Figure29).
4.Slowlypourdistilledwaterintoeachbatterycelluntil
theelectrolytelevelisuptotheUpperline(Figure29)
onthebatterycase.
Important:Donotoverllthebatterybecause
electrolyte(sulfuricacid)cancausesevere
corrosionanddamagetothechassis.
5.Wait5to10minutesafterllingthebatterycells.
Note:Adddistilledwater,ifnecessary,untilthe
electrolytelevelisuptotheUpperline(Figure29)on
thebatterycase.
6.Installthebatteryllercaps.
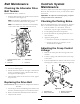
ChargingtheBattery
WARNING
Chargingthebatteryproducesgassesthatcan
explode.
Neversmokenearthebatteryandkeepsparksand
amesawayfrombattery.
Important:Alwayskeepthebatteryfullycharged(1.265
specicgravity).Thisisespeciallyimportanttoprevent
batterydamagewhenthetemperatureisbelow32°F
(0°C).
1.Checktheelectrolytelevel;refertoCheckingthe
ElectrolyteLevel(page25).
2.Makesurethatthellercapsareinstalledinthebattery.
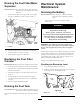
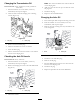
3.Chargethebatteryfor10to15minutesat25to30
ampsor30minutesat4to6amps(Figure30).
Note:Donotoverchargethebattery.
1
2
3
4
G003792
Figure30
1.Positivebatterypost
3.Red(+)chargerlead
2.Negativebatterypost
4.Black(-)chargerlead
4.Whenthebatteryisfullycharged,unplugthecharger
fromtheelectricaloutlet,thendisconnectthecharger
leadsfromthebatteryposts(Figure30).
5.Replacethebatterycover.
26