
Operator's Manual


InstallingtheControlValveonthePro
Sneak365
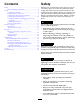
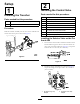
1.Attachthebrackettothevalve(Figure7).
1 2 3 4 5
g025479
Figure7
1.Bolts4.Washers
2.Bracket5.Nuts
3.Valve
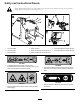
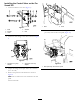
2.AttachthevalvettingstothevalveasshowninFigure
8.
1
2
2
g025478
Figure8
1.90-degreelongdrop
adapter
2.90-degreeshortdrop
adapter
3.Torquethettingsontheportsideto36to44N-m
(27to33ft-lb).
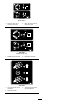
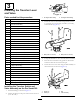
4.Removethepanelfromthemachineasshownin
Figure9.
Note:Donotremovethehosesattachedtotheside
panel.
Settheboltsaside.
g025477
1 2
Figure9
1.Bolts2.Panel
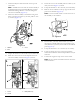
5.Attachthebrackettothemachineusingthebolts
previouslyremovedfromthepanel(Figure10).
g025480
1
Figure10
1.Boltspreviouslyremovedfrompanel
7