
Service Manual

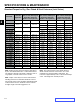

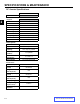
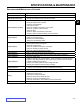
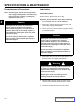
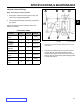

Table Of Contents
- 1 Safety - 30in Aer 4 web.pdf
- 2 Specs n Maint - 30in Aer 4 web.pdf
- Torque Specifications
- Standard Torque for Dry, Zinc Plated & Steel Fasteners (Inch Series)
- Standard Torque for Dry, Zinc & Steel Fasteners (Metric Fasteners)
- 30” Aerator Specifications
- Recommended Maintenance Schedule
- Premaintenance Procedures
- Engine Maintenance
- Fuel System Maintenance
- Electrical System Maintenance
- Drive System Maintenance
- Check Tire Pressures
- Check Wheel Hub Nuts Torque Specification
- Check Wheel Lug Nuts Torque Specification
- Check Condition Of Chains
- Check Condition Of Sprockets
- Check Transmission Output Shaft Nut Torque Specification
- Jackshaft Drive Chain Tension Adjustment
- Drive Wheel Chain Tension Adjustment
- Caster Pivot Bearings Pre-Load Adjustment
- Brake Maintenance
- Belt Maintenance
- Controls System Maintenance
- Hydraulic System Maintenance
- Tine Maintenance
- 3 Chassis - 30in Aer 4 web.pdf
- 4 Hydraulics n Engine Mountg - 30in Aer 4 web.pdf
- Hydraulics
- Checking the Transmission Expansion Tank Hydraulic Oil
- Servicing the Auxiliary Hydraulic Oil
- Changing Auxiliary Hydraulic Reservoir Fluid and Filter
- Changing Hydraulic Transmission Filters and Fluid
- Transmission Belt Replacement
- Transmission Replacement
- Hydraulic Pump Belt Removal & Installation
- Idler Arm Removal & Installation
- Hydraulic Pump Rebuild
- Hydraulic Pump Assembly
- Hydraulic Cylinder Rebuild
- Engine
- Engine Replacement
- 5 Ground Dr n Tine Systems- 30in Aer 4 web.pdf
- 6 - Electrical - 30in Aer 4 web.pdf
SPECIFICATIONS & MAINTENANCE
2-9
Toro 30” Aerator Service Manual
2
Engine Maintenance
Service Air Cleaner
Service Interval: Every 250 hours - Replace the primary
air cleaner element - check secondary air cleaner
element; replace if dirty. (May need more often
under severe conditions. See the Engine Owner’s
Manual for additional information.)
Every 500 hours - Replace the secondary air cleaner
element. (May need more often under severe condi-
tions. See the Engine Owner’s Manual for additional
information.)
1. Stop engine, wait for all moving parts to stop, and
remove key. Engage parking brake.
2. See the Engine Owner’s Manual for maintenance
instructions.
Change Engine Oil
Service Interval: After the rst 5 hours
Every 100 hours (May need more often under
severe conditions.)
1. Stop engine, wait for all moving parts to stop, and
remove key. Engage parking brake.
2. Drain oil while engine is warm from operation.
3. The oil drain hose assembly is located on the left
side of the engine.
Place pan under machine to catch oil. Remove oil
drain plug. Allow oil to drain and replace oil drain
plug. Torque plug to 20-24 ft-lbs. (27-33 Nm).
4. Replace the oil lter per the Engine Owner’s Manual.
Clean around the oil lter and carefully remove the
lter by unscrewing it. Make sure no oil drains onto
the belt drives through the holes in the engine deck.
Before the new lter is installed, apply a thin coating
of Toro 4–Cycle Premium Engine Oil on the surface
of the rubber seal. Turn lter clockwise until rubber
seal contacts the lter adapter, then tighten lter an
additional 2/3 to 3/4 turn.
5. Clean around oil ll cap and remove cap. Fill to
specied capacity and replace cap.
6. Add 1.8 qt. (1.7 L) of Toro Premium Oil. Do not
overll. Start the engine and check for leaks. Stop
engine and recheck oil level.
7. Wipe up any spilled oil from engine deck mounting
surfaces.
Check Spark Plugs
Service Interval: Every 160 hours
Remove spark plugs, check condition and reset gaps,
or replace with new plugs. See the Engine Owner’s
Manual.
Check Spark Arrester (if equipped)
Service Interval: Every 50 hours
Warning
Hot exhaust system components may ignite
gasoline vapors even after the engine is
stopped. Hot particles exhausted during engine
operation may ignite ammable materials.
Fire may result in personal injury or property
damage.
Do not refuel or run engine unless spark arrester
is installed.
1. Stop engine, wait for all moving parts to stop, and
remove key. Engage parking brake.
2. Wait for mufer to cool.
3. If any breaks in the screen or welds are observed,
replace arrester.
4. If plugging of the screen is observed, remove
arrester and shake loose particles out of the arrester
and clean screen with a wire brush (soak in solvent if
necessary). Reinstall arrester on exhaust outlet.
! !