
Service Manual
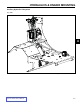
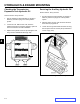
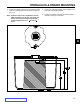
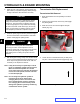


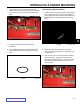
Table Of Contents
- 1 Safety - 30in Aer 4 web.pdf
- 2 Specs n Maint - 30in Aer 4 web.pdf
- Torque Specifications
- Standard Torque for Dry, Zinc Plated & Steel Fasteners (Inch Series)
- Standard Torque for Dry, Zinc & Steel Fasteners (Metric Fasteners)
- 30” Aerator Specifications
- Recommended Maintenance Schedule
- Premaintenance Procedures
- Engine Maintenance
- Fuel System Maintenance
- Electrical System Maintenance
- Drive System Maintenance
- Check Tire Pressures
- Check Wheel Hub Nuts Torque Specification
- Check Wheel Lug Nuts Torque Specification
- Check Condition Of Chains
- Check Condition Of Sprockets
- Check Transmission Output Shaft Nut Torque Specification
- Jackshaft Drive Chain Tension Adjustment
- Drive Wheel Chain Tension Adjustment
- Caster Pivot Bearings Pre-Load Adjustment
- Brake Maintenance
- Belt Maintenance
- Controls System Maintenance
- Hydraulic System Maintenance
- Tine Maintenance
- 3 Chassis - 30in Aer 4 web.pdf
- 4 Hydraulics n Engine Mountg - 30in Aer 4 web.pdf
- Hydraulics
- Checking the Transmission Expansion Tank Hydraulic Oil
- Servicing the Auxiliary Hydraulic Oil
- Changing Auxiliary Hydraulic Reservoir Fluid and Filter
- Changing Hydraulic Transmission Filters and Fluid
- Transmission Belt Replacement
- Transmission Replacement
- Hydraulic Pump Belt Removal & Installation
- Idler Arm Removal & Installation
- Hydraulic Pump Rebuild
- Hydraulic Pump Assembly
- Hydraulic Cylinder Rebuild
- Engine
- Engine Replacement
- 5 Ground Dr n Tine Systems- 30in Aer 4 web.pdf
- 6 - Electrical - 30in Aer 4 web.pdf

HYDRAULICS & ENGINE MOUNTING
4-7
Toro 30” Aerator Service Manual
4
Changing Hydraulic Transmission
Filters and Fluid
Service Interval: After the rst 100 hours, every 250
hours thereafter
Hydraulic Transmission Filter Removal
1. Stop engine, wait for all moving parts to stop.
Remove key and spark plug wires. Engage parking
brake.
2. Locate the two lters under the transmissions.
Remove lter guards (Fig. 075).
Hydraulic Transmission Filter Installation
1. Apply a thin coat of Hydro Oil to the surface of
the rubber seal on the new oil lter. Turn the lter
clockwise until the rubber seal contacts the lter
adapter, then tighten the lter an additional 3/4 to 1
full turn.
2. Fill through EXPANSION TANK (Fig. 076).
Fig. 075 hyd lter
3. Carefully clean area around lters. It is important
that no dirt or contamination enter hydraulic system
and remove the lters.
Toro Premium Hydro Oil s recom mended. Refer to the
chart for an acceptable alternative:
Hydro Oil Change Interval
Toro Premium Hydro Oil
(Preferred)
500 Hours
Mobil 1 15W50 250 Hours
3. Continue to add oil until it reaches the full cold line
on the expansion reservoir.
Fig. 076 expansion tank