
Installation Instructions


FormNo.3359-274RevD
RearDischargeCompletionKit
ForBase62inMowerforGroundsmaster
®
3320and3280–D
ForBase72inMowerforGroundsmaster
®
3320and3280–D
ModelNo.30305
ModelNo.30303
InstallationInstructions
Installation
The62inchRearDischargeCompletionKit,Model
30305canbeinstalledonthebasemower,Model30403
The72inchRearDischargeKit,Model30303canbe
installedonthebasemower,Model30404
62InchRearDischarge
CompletionKitInstallation
1.Blockupthedecksoitdoesnotaccidentallyfall.
2.Removethecoversfromthetopofthedeck.
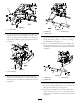
3.Looselymountthedeckchamberstotheunder
sideofthemowerdeckwith(12)5/16x3/4in.
carriageboltsandangenuts.Theboltheadsare
topositionedinsidethemowerdeck.Positionthe
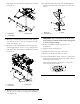
chambersasshowninFigure1.
Note:Use3boltsandnutsfortheleftchamber,4
forthecenterchamberand5fortherightchamber.
Figure1
1.L.H.chamber3.R.H.chamber
2.Centerchamber
4.Looselymounttheouterchamberstothecenter
chamberwith(2)5/16x3/4in.carriageboltsand
angenuts(Figure1).
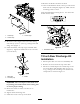
5.Mounttherubberdeectortotheleftrearcornerof
thecuttingunitwithaholddown,(2)5/16x1in.lg.
carriageboltsandangenuts.Positionthedeector
asshowninFigure2.
Figure2
1.Rubberdeector
2.Holddown
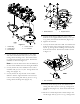
6.LooselymounttheL.H.footshieldtotherubber
deectorusingthefastenersandlocationsdetailed
below(Figure3).
•Frontedge–(2)5/16x1in.lg.carriagebolts
andangenuts.
•Sideedge–(2)5/16x1in.lg.carriagebolts
andangesnuts.
•Side–(1)1/4x3/4in.lg.capscrew,5/16x3/4
atwasherandlocknut.
•Top–(1)1/4x3/4in.lg.capscrew,5/16x3/4
atwasherandlocknut.
•Tightenthefasteners.
©2007—TheToro®Company
8111LyndaleAvenueSouth
Bloomington,MN55420
Registeratwww.Toro.com.
OriginalInstructions(EN)
PrintedintheUSA.
AllRightsReserved