
Operator's Manual

3
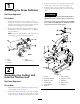
MountingtheBlower
Partsneededforthisprocedure:
1
Dischargeshelf
2
Carriagebolt,3/8x1in
2
Flangenut,3/8in
1
Frontbafe
3
Capscrew,3/8x1in
1
Carriagebolt,3/8x1in
3Washer
4
Flangenut,3/8in
1
Rearbafe
2
Capscrew,3/8x1in
2
Flangenut,3/8in
1Drivepulley
1Pulleynut
2
Springclip
2
Panheadscrew,#8x1/2in
2
Nut,#8
1Tie-downbracket
3
Carriagebolt,5/16x1in
3
Locknut,5/16in
1Beltcovermountingbracket
2
Capscrew,5/16x1in
2
Locknut,5/16in
1Blowerassembly
1V-belt
1Beltcover
Procedure
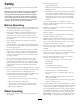
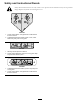
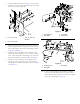
1.Raiseandblockuptherightsideofcuttingunitsothe
castorwheelisjustoffoftheoor.
2.Removetheboltsandnutssecuringtherightcastorarm
tothecuttingunit(Figure4).Removethecastorarm.
Figure4
1.RightCastorarm
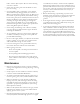
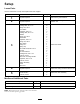
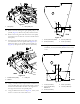
3.Removethetworightdeckcoversandthecenterdeck
coverfromthetopofthecuttingunit(Figure5).
Figure5
1.Rightdeckcovers
4.Adjustableowbafe
2.Centerdeckcover5.Dischargebafe
3.Camlock
4.Removethecamlock,washer,nutandboltsecuring
theadjustableowbafetothecuttingunit(Figure5).
Removethebafeandcomponents.
5.Removetheboltsandnutssecuringthedischarge
bafetothecuttingunit(Figure5).Removethebafe
andcomponents.
Note:Savethebafesandhardwareforusewhen
changingtothesidedischargingmode.
8