
Operator's Manual

G009487
1
2
1
3
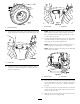
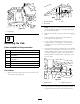
Figure66
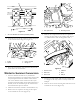
1.Bolt3.Powerpointshield
2.Powerpointassembly
7.Slidethepowerpointshieldupoverpowerpointwhile
aligningtheshieldholewiththeholeinthepower
pointassemblyplate(Figure66).Thelongerendofthe
shieldistopointforwardtoprotectthepowerpoint.
8.Securetheshieldtothecabwiththeboltpreviously
removed.
10
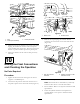
MakingtheFinalConnections
andCheckingtheOperation
NoPartsRequired
Procedure
1.Tightentheboltsandnutssecuringthecabmount
supportstotheROPSposts.
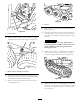
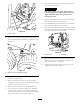
2.Connectthecabpressureandreturnheaterhosesto
thequickcouplersontherearframemount(
Figure67).
Figure67
1.Returnhose2.Pressurehose
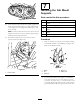
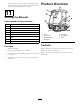
3.Removethecapandplugthecabwireharness
connectorintotheharnessontherearframemount
(Figure68).
Figure68
1.Cabwireharness
connector
2.Harnessconnectoronthe
rearframemount
4.Reinstallthebackpaneltothecab.
Note:Reinstallthedoorsandwindows(ifremoved)
andsecuredoorclosertothecabdoorbracket.
5.Filltheradiator.RefertotheOperator'sManualforuid
specications.
6.Checkthehydraulicuidlevelandreplenishas
required.RefertotheOperator'sManualforuid
specications.
26