
Installation Instructions


3
InstallingtheDualRateFlasher
Partsneededforthisprocedure:
1
Dualrateasher
2
Acornheadself-tappingscrews
Procedure
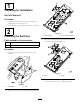
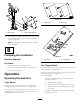
Mountthedualrateashertotherightframepanelwith2
acornheadself-tappingscrews(Figure4).Positiontheasher
sothewiresleaddownwards.
1
g018281
Figure4
1.Dualrateasher
4
InstallingtheHeadlights
Partsneededforthisprocedure:
2Headlight
2
Carriagebolt
2Locknut
Procedure
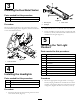
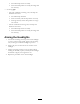
1.Locatethepilotholeineachmountingtabonthefront
ofthecarrierframe(
Figure5).
g018282
1
2
3
Figure5
1.Mountingtab
3.Carrierframe
2.Headlight
2.Drilleachholeouttoa0.344inch(0.87cm)diameter.
3.Secureaheadlighttoeachtabusingacarriageboltand
alocknut(5/16–18).Discardthelockwashersandnuts
includedwiththelights(Figure5).
5
InstallingtheTailLight
Flashers
Partsneededforthisprocedure:
1
RHtaillightasher
1
LHtaillightasher
2Worklight
1RHbracket
1LHbracket
4
Bolt(M8–1.25)
2
Carriagebolt
2Locknut
4U-bolt
4
Locknut(3/8–16inch)
Procedure
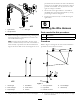
1.Mounttheappropriatetaillightashertoeachlight
bracket,keepingtheblacklenstowardsthefrontofthe
machine,using2bolts(M8–1.25)positionedasshown
in(Figure6).Tightentheboltsto6ft–lbs(8.1N–m).
3