
Installation Instructions


g018283
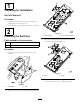
1
2
3
Figure6
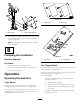
1.Lightbracket3.Worklight
2.Taillightasher
2.Secureaworklighttoeachbracketusingacarriagebolt
andlocknut(Figure6).Discardthelockwasherand
nutincludedwiththelights.
Note:Thelightcanbemountedtotherearofthe
brackettoshinerearward,tothefrontofthebracketto
shineforward,orpointedtothesidetoilluminatethe
edgeofthemowerdeck.Notethatthelightsarenotas
protectedwhenmountedtothesideofthebrackets;
watchoutfortreelimbs.Mountthelightsashighas
possibleontheROPS.Youmayhavetomovethe
lightsifacanopyisinstalled.
3.Mounteachofthelightbracketstotheinsideof
theROPSusing2U-boltsand2locknuts(3/8–16),
positioningitasshowninFigure6.
4.Tightenthelocknutsevenlytoavoiddistortingthe
lightbracket.
6
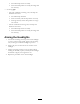
InstallingtheWireHarness
Partsneededforthisprocedure:
1Wireharness
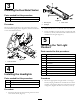
7
Cabletie
Procedure
RefertoFigure7throughoutthewireharnessinstallation
procedurefortheconnectorlocations.
1
2
3
4
5
6
g018286
7
8
9
11
11
10
Figure7
1.Lefttaillight4.Dualasher
7.Turnsignalswitch10.Frontheadlight
2.Rearworklight5.Powersource8.Lightswitch11.Harnessclip
3.Righttaillight
6.Ground
9.Harnessconnector
1.Plugtheharnessconnectorsintothefrontheadlights.2.Routetheharnessunderthecarrierframetotheright
sideofthemachine.
4