6,47 " " ! 24 4271(50%56)4; !2 71()456%1( 6,-5 342(7'6 %1( *24 5%*)6: %1( 236-070 3)4*240%1') 4)%( 6,-5 0%17%/ &)*24) 56%46-1+ 6,) )1+-1) %: 53)'-%/ %66)16-21 62 !$ ! " ! ,-+,/-+,6)( &: 6,-5 5:0&2/ )8 ! " 6 0)%15 "! # 24 3)4521%/ 5%*)6: -15647'6-21 %-/74) 62 '203/: 9-6, 6,) -15647'6-21 0%: 4)57/6 -1 3)4521%/ -1.
This operator's manual has instructions on safety, proper set-up and operation, adjustments and maintenance. Therefore, anyone involved with the product, including the operator, should read and understand this manual. Major sections are: - Safety Instructions - Maintenance - Before Operating - Schematics - Operating Instructions - Seasonal Storage This manual emphasizes safety, mechanical and general product information. , and identify safety messages.
! )& 9 6"2 3&23&% ".% $&13*'*&% #7 '/1 $/-0,*".$& 6*3) 3)& 9 20&$*'*$"3*/.2 /' 3)& -&1*$". "3*/.", 3".%"1%2 .23*343& ,3)/4() )"8"1% $/.31/, ".% "$$*%&.3 01&5&.3*/. 0"13*",,7 "1& %&0&.%&.3 40/. 3)& %&2*(. ".% $/.'*(41"3*/. /' 3)& -"$)*.& 3)&2& '"$3/12 "1& ",2/ %&0&.%&.3 40/. 3)& "6"1&.&22 $/.$&1. ".% 01/0&1 31"*.*.( /' 3)& 0&12/..&, *.5/,5&% *. 3)& /0&1"3*/. 31".20/13 -"*.3&.".$& ".% 23/1"(& /' 3)& -"$)*.& -01/0&1 42& /1 -"*.3&.".$& /' 3)& -"$)*.
! Operator must be skilled and trained in how to drive on hillsides. Failure to use caution on slopes or hills may cause loss of control and vehicle to tip or roll possibly resulting in personal injury or death. This product may exceed noise levels of 85 dB(A) at the operator position. Ear protectors are recommended, for prolonged exposure, to reduce the potential of permanent hearing damage.
! "& !" # " ! The following safety and instruction decals are affixed to the cutting unit. If any decal becomes illegible or damaged, install a new decal. Part numbers are listed below and in your Parts Catalog. # $ ! '79 4 *51'(* 4;*7 *+47* 5*7'9.3, " !" '79 4 *.,-9 4+ (:9 )/:89.3, 74(*):7* #"" ! '79 4 !57.3, 4')*) " !" '79 4 *.,-9 4+ :9 )/:89.
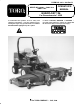
/) 126" width of cut, seven blade, front mounted rotary. 54" width of cut, three blade center section. Two 36" width of cut wings; 90" width of cut with one wing up. Rear discharge with even dispersion over the entire width of cut. "' $+ Wings can be hydraulically raised from the operator's seat for transport or cutting with either wing and center deck or center deck only. Wings cut from level to 15 up and down. Further lift disengages the blade and applies a blade brake. (.
! ! ! ! ! ! +) Mount a wear plate inside of each rear deck strap with (2) capscrews and locknuts (Fig. 3). Capscrew head to be positioned inward as shown in figure 3. 04' Before installing cutting unit on a used traction unit, inspect lift arm ball joints to make sure they are not worn or damaged. Replace, if necessary.
! $ ,* The gear box is designed to operate on SAE 80-90 wt. gear lube. Although the gear box is shipped with lubricant from the factory, initially, check the level before operating the cutting unit and every 50 hours thereafter. Check daily for signs of oil loss. Position the machine and cutting unit on a level surface. Remove check plug from side of gear box and make sure lubricant is up to bottom of hole.
&$ On each side of the center deck is a safety door that opens and closes as the wing decks are lowered and raised (Fig. 9). The doors open to provide overlap of the cutting blades when the wing units are down. The doors close to provide safety and protection when the wing units are raised. Check to make sure the forward, lower edge of door is even or 1/4" higher then lower edge of door guide when wing decks are in the fully raised, transport position.
# " ' / ) %$ - Before mowing grass, practice operating machine in an open area. Start and stop the engine. Operate in forward and reverse. When you feel familiar with the machine, practice operating around trees and obstacles. Also drive up and down slopes at different speeds. When operating 4 wheel drive machine, always use the seat belt and ROPS together and have seat pivot retaining pin installed.
! - Under most normal conditions you'll need to mow approximately every 4-5 days. But remember, grass grows at different rates at different times. This means that in order to maintain the same height-of-cut, which is a good practice, you'll need to cut more frequently in early spring; as the grass growth rate slows in mid summer, cut only every 8-10 days.
The cutting unit has grease fittings that must be lubricated regularly with No. 2 General Purpose Lithium Base Grease. If machine is operated under normal conditions, lubricate all grease fittings after every 25 hours of operation. Lubricate all grease fittings immediately after every washing, regardless of interval listed. The grease fittings that must be lubricated are: blade spindles (7), lift cylinder ball joints (4) and Wing Deck Pivot pins (4) (Fig.
! 2 34(8(16 $&&,'(16$/ 56$46,1* 2) 6+( (1*,1( 9+,/( 3(4)240,1* 0$,16(1$1&( 5+76 (1*,1( 2)) $1' 4(028( .(; )420 ,*1,6,21 59,6&+ 26( Although not required for normal maintenance procedures, the cutting unit may be pivoted (tilted) to a upright position. Should you desire to tilt the cutting unit, use the following procedure: 2 ,826 ,/6 766,1* !1,6 !34,*+6 Drive machine onto ramps to raise front of machine.
Remove (4) capscrews, flatwashers and flange nuts securing ball joint mounts to castor arms on cutting unit. Secure ball joint mounts to castor arms with capscrews, flatwashers and flangenuts. Tighten capscrews and flangenuts to 100-110 ft-lb. Line up holes in yoke and input shaft of gear box. Slide yoke onto shaft and secure together with socket head screws. Torque screws to 20-25 ft-lb.
"!! " ! ! ! ! .$&' 2.$0' +4 $&,645'& $5 5*' ($%5138 $0& 4*16.& 015 0''& (635*'3 $&,645/'05 "! *'%- (13 2312'3 12'3$5+10 1( 5*' 4$('58 &1134 '$%* 5+/' 5*' &'%- +4 %.'$0'& $0& 3'2$+3 $4 0''&'& " ! ! +) To assure proper operation of the cutting unit, there must be .25 +.12" clearance between the tips of the wing and center cutting unit blades. Raise cutting unit so blades are visible and block center deck section so it cannot fall accidentally.
, $*,2$ '+% $"( $)0/ To relieve tension on center deck belt, pull back on idler pulley until holes in idler adjustor tube and tube sleeve are aligned. Thread a 5/16-18 capscrew into holes retaining parts. #)$. -1))$5 /-.'+% ), #$# 1/$ " 10',+ 3&$+ .$)'$2'+% /-.'+% 0$+/',+ ,+ 3'+% !$)0 To relieve tension on wing belt, pull back on idler pulley until holes in idler adjustor tube and tube sleeve are aligned. Thread a 5/16-18 capscrew into holes retaining parts.
"!! " ! ! " ! "! ,* The deck clutches are adjustable to ensure proper engagement and blade braking. Check clutch adjustment after the first 50 hours of operation, thereafter; every 200 hours. Adjust if required. Inspect castor spindle for wear and replace it if damaged. Push castor spindle through bushings and mounting tube. Slide spacer(s) onto spindle. Install HOC cap on castor spindle to retain all parts in place.
Install castor wheel assembly between castor fork and secure in place with capscrew and locknut. *(41& "23/1 6)&&, &"1 "23&1 *5/3 1- *(41& ,"%& #/,3 .3* $",0 40 &"1*.( &"1*.( 0"$&1 *( *( Raise cutting unit to highest position, shut the engine off and engage the parking brake. Engage transport latches to prevent cutting unit from falling accidentally.
! $#(&" To check blade for being straight and parallel, lay blade on a level surface and check its ends. Ends of blade must be slightly lower than the center, and cutting edge must be lower than the heel of the blade. This blade will produce good quality of cut and require minimal power from the engine.
)& /2/ /--&2$*", 2/%5$43 7/ !&"2 *-*4&% "22".49 )& /2/ /-0".9 7"22".43 9/52 /2 .&7&2 /2/ /--&2$*", 2/%5$4 : 2/%5$4 052$)"3&% "'4&2 ".5"29 4/ #& '2&& '2/- %&'&$43 *. -"4&2*",3 /2 7/2+-".3)*0 '/2 4)& 0&2*/% /' 4*-& ,*34&% #&,/7 )&2& " 7"22".4"#,& $/.%*4*/. &8*343 /2/ 7*,, 2&0"*2 4)& 2/%5$4 "4 ./ $/34 4/ 9/5 *.$,5%*.( %*"(./3*3 ,"#/2 0"243 ".% 42".30/24"4*/. )*3 7"22".49 #&(*.3 /. 4)& %"4& 4)& 2/%5$4 *3 %&,*6&2&% 4/ 4)& /2*(*.", 2&4"*, 052$)"3&2 "22".49 52"4*/.