
Installation Instructions

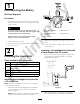
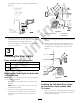

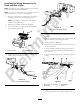

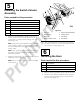
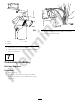
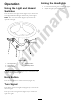
Table Of Contents

1
DisconnectingtheBattery
NoPartsRequired
Procedure
1.Positionthemachineonalevelsurface,settheparking
brake,lowerthecuttingunits,turntheignitionoff,and
removethekey.
CAUTION
Ifyouleavethekeyintheignitionswitch,
someonecouldaccidentlystarttheengineand
seriouslyinjureyouorbystanders.
Removethekeyfromtheignitionswitch
beforeyoudoanymaintenance.
2.Unlatchandraisethehood.
3.Disconnectthenegativebatterycablefromthebattery.
4.Lowerthehood.
2
InstallingtheHeadlights
Partsneededforthisprocedure:
1Headlightbracketassembly,L.H.
1Headlightbracketassembly,R.H.
1
HeadlightbracketL.H.(formachineswithlessthana
72–inchdeck)
3
Bolt(1/2inch)
4
Bolt(3/8inch)
3
Nut(1/2inch)
InstallingtheHeadlightsforUnitswith
a72–inchDeck
Note:Removetheheadlightcoversthatarelooselyplaced
ontheheadlightassemblies.
1.MounttheR.HandL.Hheadlightbracketassemblies
totheexistingholesinthefrontoftheoperators
platform(Figure1).
Note:Ensurethattheturnsignallensontheheadlight
ispositionedtowardtheoutsideofthemachine.
2
g019194
1
5
4
3
Figure1
1.R.H.headlightbracket
assembly
4.Bolt(3/8inch)
2.L.H.headlightbracket
assembly
5.Bolt(1/2inch)
3.Bolt(1/2inch)
2.Secureeachofthebolts(1/2inch)withanut(1/2
inch).
3.Torquethefastenersto129to156N-m(95to115
ft-lbs)(Figure1).
InstallingL.H.HeadlightsforUnitswith
aDeckSmallerthan72–inches
1.Removethefastenersconnectingtheheadlighttothe
longbracket.Setasidethehardwaretoinstallthe
smallerbracket(Figure2).
g019391
Figure2
2.Removethefastenersconnectingthelongbracketto
thecurvedbracketthatisattachedtothemachine.
3