
Installation Instructions

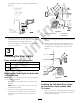

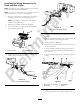

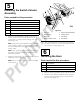
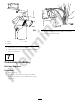
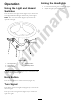
Table Of Contents

Setasidethehardwaretoinstallthesmallerbracket
(Figure2).
g019390
Figure3
3.Installthesmallerbracketincludedinthekittothe
curvedbracketthatiscurrentlyattachedtothemachine
usingthefastenersfromStep2(Figure3).
Installtheheadlighttothebracketusingthefasteners
fromStep1(Figure3).
3
InstallingtheRearLights
Partsneededforthisprocedure:
1L.H.rearlightassembly
1R.H.rearlightassembly
1
Shortbracket(formachineswithadecksmallerthan
72–inches)
InstallingtheRearLightsforUnitswith
a72–InchDeck
Note:Removetherearlightcoversthatarelooselyplaced
ontheheadlightassemblies.
1.RemovetheexistingL.H.bracketontherearofthe
machine.
Note:Removeonebracketatatimetoensurethe
hoodwillremainstable.
2.MounttheL.H.rearlightbracketassemblytothe
existingholesintherearofthemachineusingthe
hardwarefromthebracketspreviouslyremoved
(
Figure4).
1
g019193
2
3
4
Figure4
1.L.H.rearlightassembly3.Lockwasher
2.Bolt4.Flatwasher
3.RemovetheexistingR.H.bracketontherearofthe
machine.
4.MounttheR.H.rearlightbracketassemblytothe
existingholesintherearofthemachineusingthe
hardwarefromthebracketspreviouslyremoved
(Figure5).
g019196
Figure5
InstallingtheLeftHandRearLights
forUnitswithaDecksmallerthan
72–inches
1.RemovethefastenersconnectingtheL.H.rearlightto
thelongbracket.Setasidethehardwaretoinstallthe
smallerbracket(Figure6).
4