
Installation Instructions

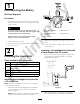
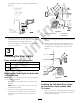

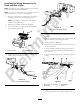

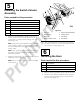
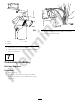
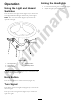
Table Of Contents

5
InstallingtheSwitchColumn
Assembly
Partsneededforthisprocedure:
1
Columnbracketassembly
1
HornSwitchassembly
1
Columnbracketmount
2
Carriagebolt(3/8inch)
2
Flangenut(3/8inch)
1
Columncover
2
Screw(1/2inch)
1.Mountthecolumnbracketassemblytotherearof
steeringcolumnwiththecolumnbracketmount,2
carriagebolts(3/8inch)andthe2angenuts(3/8
inch)(Figure16).
Note:Positionthecolumnbracketashighaspossible
onthesteeringcolumnasshowninFigure16.Ensure
thatthecolumnbracketdoesnotinterferewiththe
steeringwheel.
Note:Overtighteningthecarriagescrews/angenuts
maydistortthecolumnbracketprohibitingthecover
frombeinginstalled.
2.Mountthehornswitchtothecolumnbracketwiththe
rubberhornbutton(Figure16).
Note:Donotusethesilverfastenerbuttonincluded
withthehorn.
g019598
1
2
3
4
5
6
7
8
Figure16
1.Screw(2)5.Columnbracketassembly
2.ColumnCover6.Carriagescrew
3.Flangenut7.Hornbutton
4.Columnbracketmount
8.Hornswitch
3.Afterthewireharnessisconnectedtotheswitches,
mountthecolumncovertothecolumnbracketwith
the2screws(1/2inch)(Figure16).
6
InstallingtheHorn
Partsneededforthisprocedure:
1Hornassembly
1
Screw(5/16x3/4inch)
1
Flangeheadnut(5/16inch)
1Mountingbracket
1.Removetheexistingbracketandsetasidethefasteners.
2.Mountthehornbracketincludedinthiskitusingthe
fastenersfromthebracketthatwasremovedinthe
previousstep(
Figure17).
8