
Installation Instructions

1
All Rights Reserved
Printed in the USA
2004 by The Toro Company
8111 Lyndale Avenue South
Bloomington, MN 55420-1196
Leaf Mulching Kit
Groundsmaster
4100–D
Model No. 30419
Form No. 3350–925
Installation Instructions
Note: On machines with serial numbers 240000001 & Up,
the mounting holes for the mulching screens are already
drilled in the decks.
1. Remove the covers from the center deck.
2. Using the instructions in the Operator’s Manual, pivot
(tilt) the cutting unit to the upright position.
3. While aligning the holes in the center deck mulching
screen with the existing holes in the deck, position the
center deck mulching screen into the deck as shown in
figure 1.
4. Using carriage bolts and nuts, mount the center deck
mulching screen to the deck as shown in figure 1.
5. Rotate the center deck blades to assure there is enough
clearance between the blades and the mulching screen.
There should be approximately 3/8” clearance.
6. Using the mulching screen as a template, mark the
remaining mounting hole locations in the deck.
7. Remove the mulching screen and drill 11/32” dia.
holes at the locations marked.
8. Secure the mulching screen to the deck with (6)
carriage bolts and flange nuts. The carriage bolts are to
be installed from the bottom of the deck. Torque to
105 in–lb.
9. Pivot (tilt) the deck down into the operating position
and install the covers.
10. Remove the cover from the left or right wing decks.
11. Raise the wing deck in which the cover was removed.
12. While aligning the holes in the wing deck mulching
screen with the existing holes in the deck, position the
wing deck mulching screen into the deck as shown in
figure 1.
13. Rotate the wing deck blades to assure there is enough
clearance between the blades and the mulching screen.
There should be approximately 3/8” clearance.
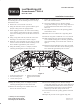
2
1
3
4
4
Figure 1
1. Center deck mulching screen
2. R.H. deck mulching screen
3. L.H. deck mulching screen
4. Install the carriage bolts from
the top at these two locations
only
14. Using the mulching screen as a template, mark the
remaining mounting hole locations in the deck.
15. Remove the mulching screen and drill 11/32” dia.
holes at the locations marked.
16. Secure the mulching screen to the deck with (4)
carriage bolts and flange nuts. The carriage bolts are to
be installed from the bottom of the deck except for at
the inward most location where it must be installed
from the top of the deck. Torque to 105 in–lb.
17. Lower the deck into the operating position and install
the cover.
18. Repeat the procedure on the opposite wing deck.