
Installation Instructions

1
All Rights Reserved
Printed in the USA
W 2006 by The Toro Company
8111 Lyndale Avenue South
Bloomington, MN 55420-1196
Hood Screen Kit
Groundsmaster
)
4000–D & 4100–D
Model No. 30424
Form No. 3355–273 Rev B
Installation Instructions
1. Disconnect and remove the hood from the machine.
2. Disconnect and remove the rear screen assembly from
the hood.
3. Trim the forward edge of the Screen Template
(110-6175) per the directions on the template.
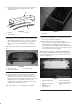
4. Tape the Screen Template to the top of the screen
assembly (Fig. 1). The template edge marked
TEMPLATE LOCATING EDGE “A” should be lined
up with the upper front mounting face on the screen
assembly.
Note: To aid in centering the template, the TEMPLATE
LOCATING CENTERLINE ”B” should line up with the 2
upper mounting holes on the screen assembly (Fig. 1).
1
2
44
3
3
Figure 1
1. Template locating edge
“A”
2. Front mounting face
3. Centerlines
4. Mounting holes
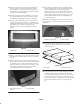
5. Center punch the (4) corners of the dashed opening.
Drill these (4) holes to 5/32 inch dia. and then follow up
to 3/8 inch dia. (Fig. 2).
6. Center punch the (2) holes used for mounting the
plenum. Drill these (2) holes to 5/32 inch dia. Do not
drill these (2) holes to 3/8 inch dia. because they will be
used for securing the plenum to the screen assembly
(Fig. 2).
2
1
2
Figure 2
1. Plenum mounting holes 2. Corner holes for opening
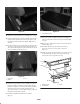
7. Using the (4) (3/8 inch dia.) holes as corner locators,
construct tangent lines to form the rectangular shaped
opening that will be removed from the top panel of the
screen. Use masking tape to outline the opening and to
eliminate any unnecessary scratching of the painted
surface (Fig. 3).
2 1
Figure 3
1. Masking tape 2. Screen assembly
8. Using a reciprocating saw or some other means, cut out
this opening in the top panel of the screen and clean up
any sharp edges (Fig. 3).