
Installation Instructions


6.Installthesteeringtowercoverandthehydraulicline
cover.
7.ThefrontandrearcablightscannotbeusedforCE
applications.Disablethefrontandrearcablights
asfollows:
•Front-Popthelightsoutofthecabroofand
disconnectthewiresfromthelights.Reinstall
thelightsintothecab.
•Rear-Removethescrewssecuringthelensesto
lights.Removethebulbsfromthelightsand
reinstallthelensestothelights.
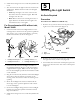
ForGroundsmaster4100withoutcab,
Model30449
1.FastentheR.HandL.H.headlightbracketstothe
existingholesinthefrontoftheoperator’splatform
withscrews(1/2x3inch)andlocknuts(1/2inch).
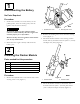
PositionthebracketsasshowninFigure7.
Figure7
1.Headlightassembly,R.H.3.Headlightbracket,L.H.
2.Headlightbracket,R.H.4.Headlightassembly,L.H.
2.FastentheR.HandL.H.headlightassembliesto
theheadlightbrackets(Figure7)withthefasteners
suppliedwiththelights.Makesuretheturnsignal
lensontheheadlightispositionedtowardtheoutside
ofthemachine.
3.Plugtheconnectorbodyfromtheenclosedheadlight
wireharnessintotheharnessconnectorofthe
steeringtowerwireharnessunderthesteeringcover
opening.
4.Routetheheadlightwireharnessunderneaththe
frontedgeoftheoperator’splatformandconnect
ittotheheadlights.
5.Securetheheadlightwiringharnesstotheheadlight
bracketsandoperator’splatformwiththeharness
clipsandcableties.
6.Installthesteeringtowercoverandthehydraulicline
cover.
5
InstallingtheLightSwitch
NoPartsRequired
Procedure
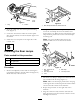
Groundsmaster4000-Dand4100-Donly
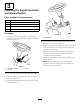
1.Removethe(2)screwsthatsecuretheplatetothe
rightcoverofthecontrolarm(Figure8).
Figure8
1.Plate
3.Controlarm
2.Rightcover
2.Removethe(6)screwsthatsecuretherightcoverto
therightsideofthecontrolarm(Figure8).
3.Frominsidethecontrolarmswitchpanel,pressthe
plugoutoftheholeinthesideofthecontrolpanel
(Figure9).
5