
Installation Instructions


11
Installingthe
Registration-PlateBracket
Partsneededforthisprocedure:
1Platelight
1Platebracket
2
Screw(#10x5/8inch)
2
Locknut(#10)
2
Self-tappingscrew(5/16x1/2inch)
Procedure
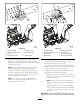
1.Securethelighttotheregistration-platebracketwith2
screws(#10x5/8inch)and2locknuts(Figure28).
Note:Donotovertightenscrews.Ensurethatthelens
pointsdownwardandthewiresareinsertedthrough
theholeintheregistration-platebracket.
2
3
4
1
5
G023197
Figure28
1.Locknut(#10)4.Screw(#10x5/8inch)
2.Registration-platebracket
5.Self-tappingscrew(5/16x
1/2inch)
3.Platelight
2.Mounttheregistration-platebrackettotherearbumper
with2self-tappingscrews(5/16x1/2inch).
Note:Positiontheregistration-platebracketasshown
in(Figure28).
12
InstallingtheWiringHarness
Partsneededforthisprocedure:
1Wireharness
1
Switch-panel-enclosurecover
3
Screw(#10x1/2inch)
3Mountingpad
11
Cabletie
Procedure
Usethefollowinginstructionsandillustrationstorouteand
connectthewiringharness.
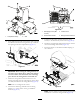
Figure29
1.Removetheange-headscrewsecuringthe
compartmentclampandsealtothetractionunit
(Figure30).
Note:Removetheclampandsealtogainaccesstothe
fusecompartment.
15