
Installation Instructions

6
InstallingtheHorn
Partsneededforthisprocedure:
1Hornassembly
1
Screw,5/16x3/4inch
1
Flangeheadnut,5/16inch
Procedure
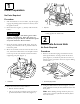
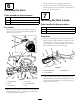
1.Removethe(2)screwsandwasherssecuringthe
frontcovertothefrontaxlebrackets(
Figure8).
Removethefrontcover.
Figure8
1.Flangeheadnut4.Frontcover
2.Screw
5.Frontaxlebracket
3.Hornbracket6.Horn
2.Mountthehornbrackettotheleftcovermounting
bracketwiththe5/16x3/4inchscrewand5/16
inchangeheadnut(Figure8).
3.Adjustthehornsotheopeningpointsdown.
4.Afterthewireharnessisconnectedtothehorn,
mountthefrontcovertothefrontaxlewiththe(2)
screwspreviouslyremoved.
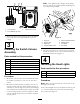
7
InstallingtheRearLamps
Partsneededforthisprocedure:
1Rearlampassembly-L.H.
1Rearlampassembly-R.H.
4
Washerheadscrew,3/8x3/4inch
Procedure
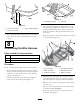
1.Usingthemountingholestotherearofthehood
latches,securealampassemblytoeachsideofthe
rearframewith(2)3/8x3/4inchwasherhead
screws(
Figure9).Ifthemountingholesarenotin
therearframe,processtothenextstep
Figure9
1.Washerheadscrew3.Mountinghole
2.Lampassembly
2.UsingthedimensionsshowninFigure10,locate,
markanddrill(2).350inch(9mm)diameterholes
ineachsideoftherearframe.Centertheholesup
anddownontheframe.
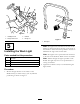
5