
Operator's Manual

7
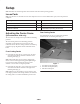
Adjusting the Height of Cut
Important This cutting deck often cuts approximately
1/4 inch lower than a reel cutting unit with the same bench
setting. It may be necessary to have these rotary cutting
deck’s bench set 1/4 inch above that of reels cutting in the
same area.
Important Access to the rear cutting units is greatly
improved by removing the cutting unit from the tractor. If
the unit is equipped with a Sidewinder,
®
sidewind the
cutting units to the right, remove the rear cutting unit, and
slide it out to the right side.
1. Lower cutting deck to ground, stop engine, and remove
key from ignition switch.
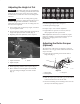
2. Loosen capscrew securing each height of cut bracket to
height of cut plate (front and each side) (Fig. 2).
3. Beginning with front adjustment, remove capscrew.
1
2
3
Figure 2
1. Height of cut bracket
2. Height of cut plate
3. Spacer
4. While supporting chamber, remove spacer (Fig. 2).
5. Move chamber to desired height-of-cut and install
spacer into designated height-of-cut hole and slot
(Fig. 3).
Figure 3
6. Position tapped plate in line with spacer.
7. Install capscrew finger tight.
8. Repeat steps 4–7 for each side adjustment.
9. Tighten all three capscrews to 30 ft.-lb. (41 N⋅m).
Always tighten the front capscrew first.
Note: Adjustments of more than 1-1/2 inch may require
temporary assembly to an intermediate height to prevent
binding (e.g. changing from 1.25 in. to 2.75 in.
height-of-cut).
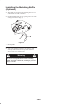
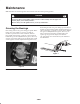
Adjusting the Roller Scraper
(Optional)
The optional rear roller scraper is designed to work best
when there is an even gap of .020–.040 inches between the
scraper and roller.
1. Loosen the top 2 mounting screws and the lower 2
flange nuts (Fig. 4).
m–5417
1
2
3
Figure 4
1. Roller scraper
2. Mounting screw
3. Flange nut
2. Slide the scraper up or down until a gap of .020–.040 in.
is achieved between the rod and the roller.
3. Secure the mounting screws and flange nuts to 30 ft.-lb.
(41 N⋅m) in an alternating sequence.