
Operator's Manual


8
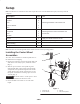
Setup
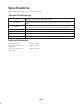
Note: Use this chart as a checklist to ensure that all parts have been received. Without these parts, total setup cannot be
completed.
Description Qty. Use
Capscrew
Washer
Nut
Lift arm bracket
Pin
4
8
4
1
1
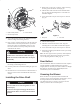
Mounting the blower to the traction unit.
Drive shaft
Capscrew
Nut
Roll pin
1
4
4
2
Mounting the drive shaft to the blower and
traction unit.
Decal 1 Apply over decal 105–0707 for CE.
Operator’s Manual 1 Read before operating the machine.
Parts Catalog 1
Registration card 1 Fill out and return to Toro.
Note: Determine the left and right sides of the machine from the normal operating position.
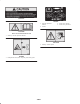
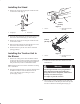
Installing the Castor Wheel
Assemblies
The castor wheel assemblies are installed upside down on
the debris blower for shipping.
1. Remove the tensioning caps from the spindle shafts and
slide off the castor wheel, spacers, and thrust washers
(Fig. 1).
2. Slide the spacers onto the castor spindle to get the
desired height. Slide a thrust washer onto the spindle
and push the castor spindle through the frame. Install
another thrust washer and the remaining spacers onto
the spindle and install the tensioning cap to secure the
assembly (Fig. 1).
Important The thrust washers—not the spacers—must
contact the top and bottom of the blower frame.
3. Ensure that both castor wheels are set at the same
height.
1
2
3
2
Figure 1
1. Tensioning cap
2. Thrust washers
3. Spacers
4. Front castor spindle